dbt, ftw
dbt data pipelines data engineering
Hindsight, they say, is 20/20. Well, in hindsight I wish I would have started using dbt 4 years ago, but I didn’t. Had I used it then, some parts of life, like the hours between 9 and 5 would have been a little more enjoyable.
But sometimes that’s how it works. The right opportunity has to come along and lead to an “ah-hah” moment - something clicks. Well, recently, it clicked for me and I’m all about dbt.
This post is about helping people understand dbt’s power in the hopes that the “a-hah” moment comes before the “uh-oh” moment.
I’ll start a project from scratch and show you how insanely easy it is to go from zero to 💯 in a flash. In the project we’ll connect dbt to BigQuery, create a model to analyze COVID-19 cases, and learn some tips and tricks along the way.
If you want to clone or reference my code while following along, you can do that here.
Before going any further, I have to say that Fishtown Analytics (the makers of dbt) have an amazing setup tutorial complete with videos. I encourage you to check it out here.
This post will diverge from their tutorial in some cases, along with provide different commentary. Where it does, I’ll try to expand on some of the basics and show how you might setup and work with dbt in the real world.
Table Of Contents
Setup
This project will take a little bit of setup, but hopefully it’s not too painful. To start we need to accomplish the following.
- Setup our data warehouse
- Install dbt
- Setup dbt
The data warehouse
To provide a working example and so we have access to public datasets I’m going to use BigQuery as the data warehouse. This would look very similar, aside from the Service Account portion if you wanted to use a local database as your data warehouse. You’ll also need some data, as dbt assumes your data has already landed.
To keep it brief I won’t write a play-by-play on setting up BigQuery but it shouldn’t be too difficult. If you need an extra hand, checkout Fishtown’s docs here.
High level you should:
- Go to GCP and sign up if you don’t have an account
- Create a new project
- Create a Service Account for dbt to act on your project
- Give the Service Account
BigQuery UserandBigQuery Job Userpermissions - Create a JSON key for your Service Account, and save it to your machine.
Installing dbt
dbt is a command line tool and can be installed using pip.
Before installing it’s always best to create a new working directory and a virtual environment for any project. Navigate to your preferred project directory and run
mkdir dbt-demo
cd dbt-demo
virtualenv venv
source venv/bin/activate
At this point, we can install dbt by running
pip install dbt==0.18.1
If you then run dbt --version you should see the following output
(venv) ➜  dbt-demo dbt --version
installed version: 0.18.1
   latest version: 0.18.1

Up to date!

Plugins:
  - bigquery: 0.18.1
  - snowflake: 0.18.1
  - redshift: 0.18.1
  - postgres: 0.18.1
🦾 way to go!
Initializing dbt
Before we get to using dbt we have to initialize our project.
For this project we’re going to analyze data on COVID-19 cases so I’m going to call my project covid-cases. You can call your project whatever you like, but I recommend following along to avoid errors further in the tutorial.
Initialize your project by running
dbt init covid-cases
Doing so will create a new directory called covid-cases in our current working directory. The files created when we ran the command will act as a template for our dbt project.
After running the dbt init command you can open the current directory in your editor of choice. Your directory structure should mirror what you see below.
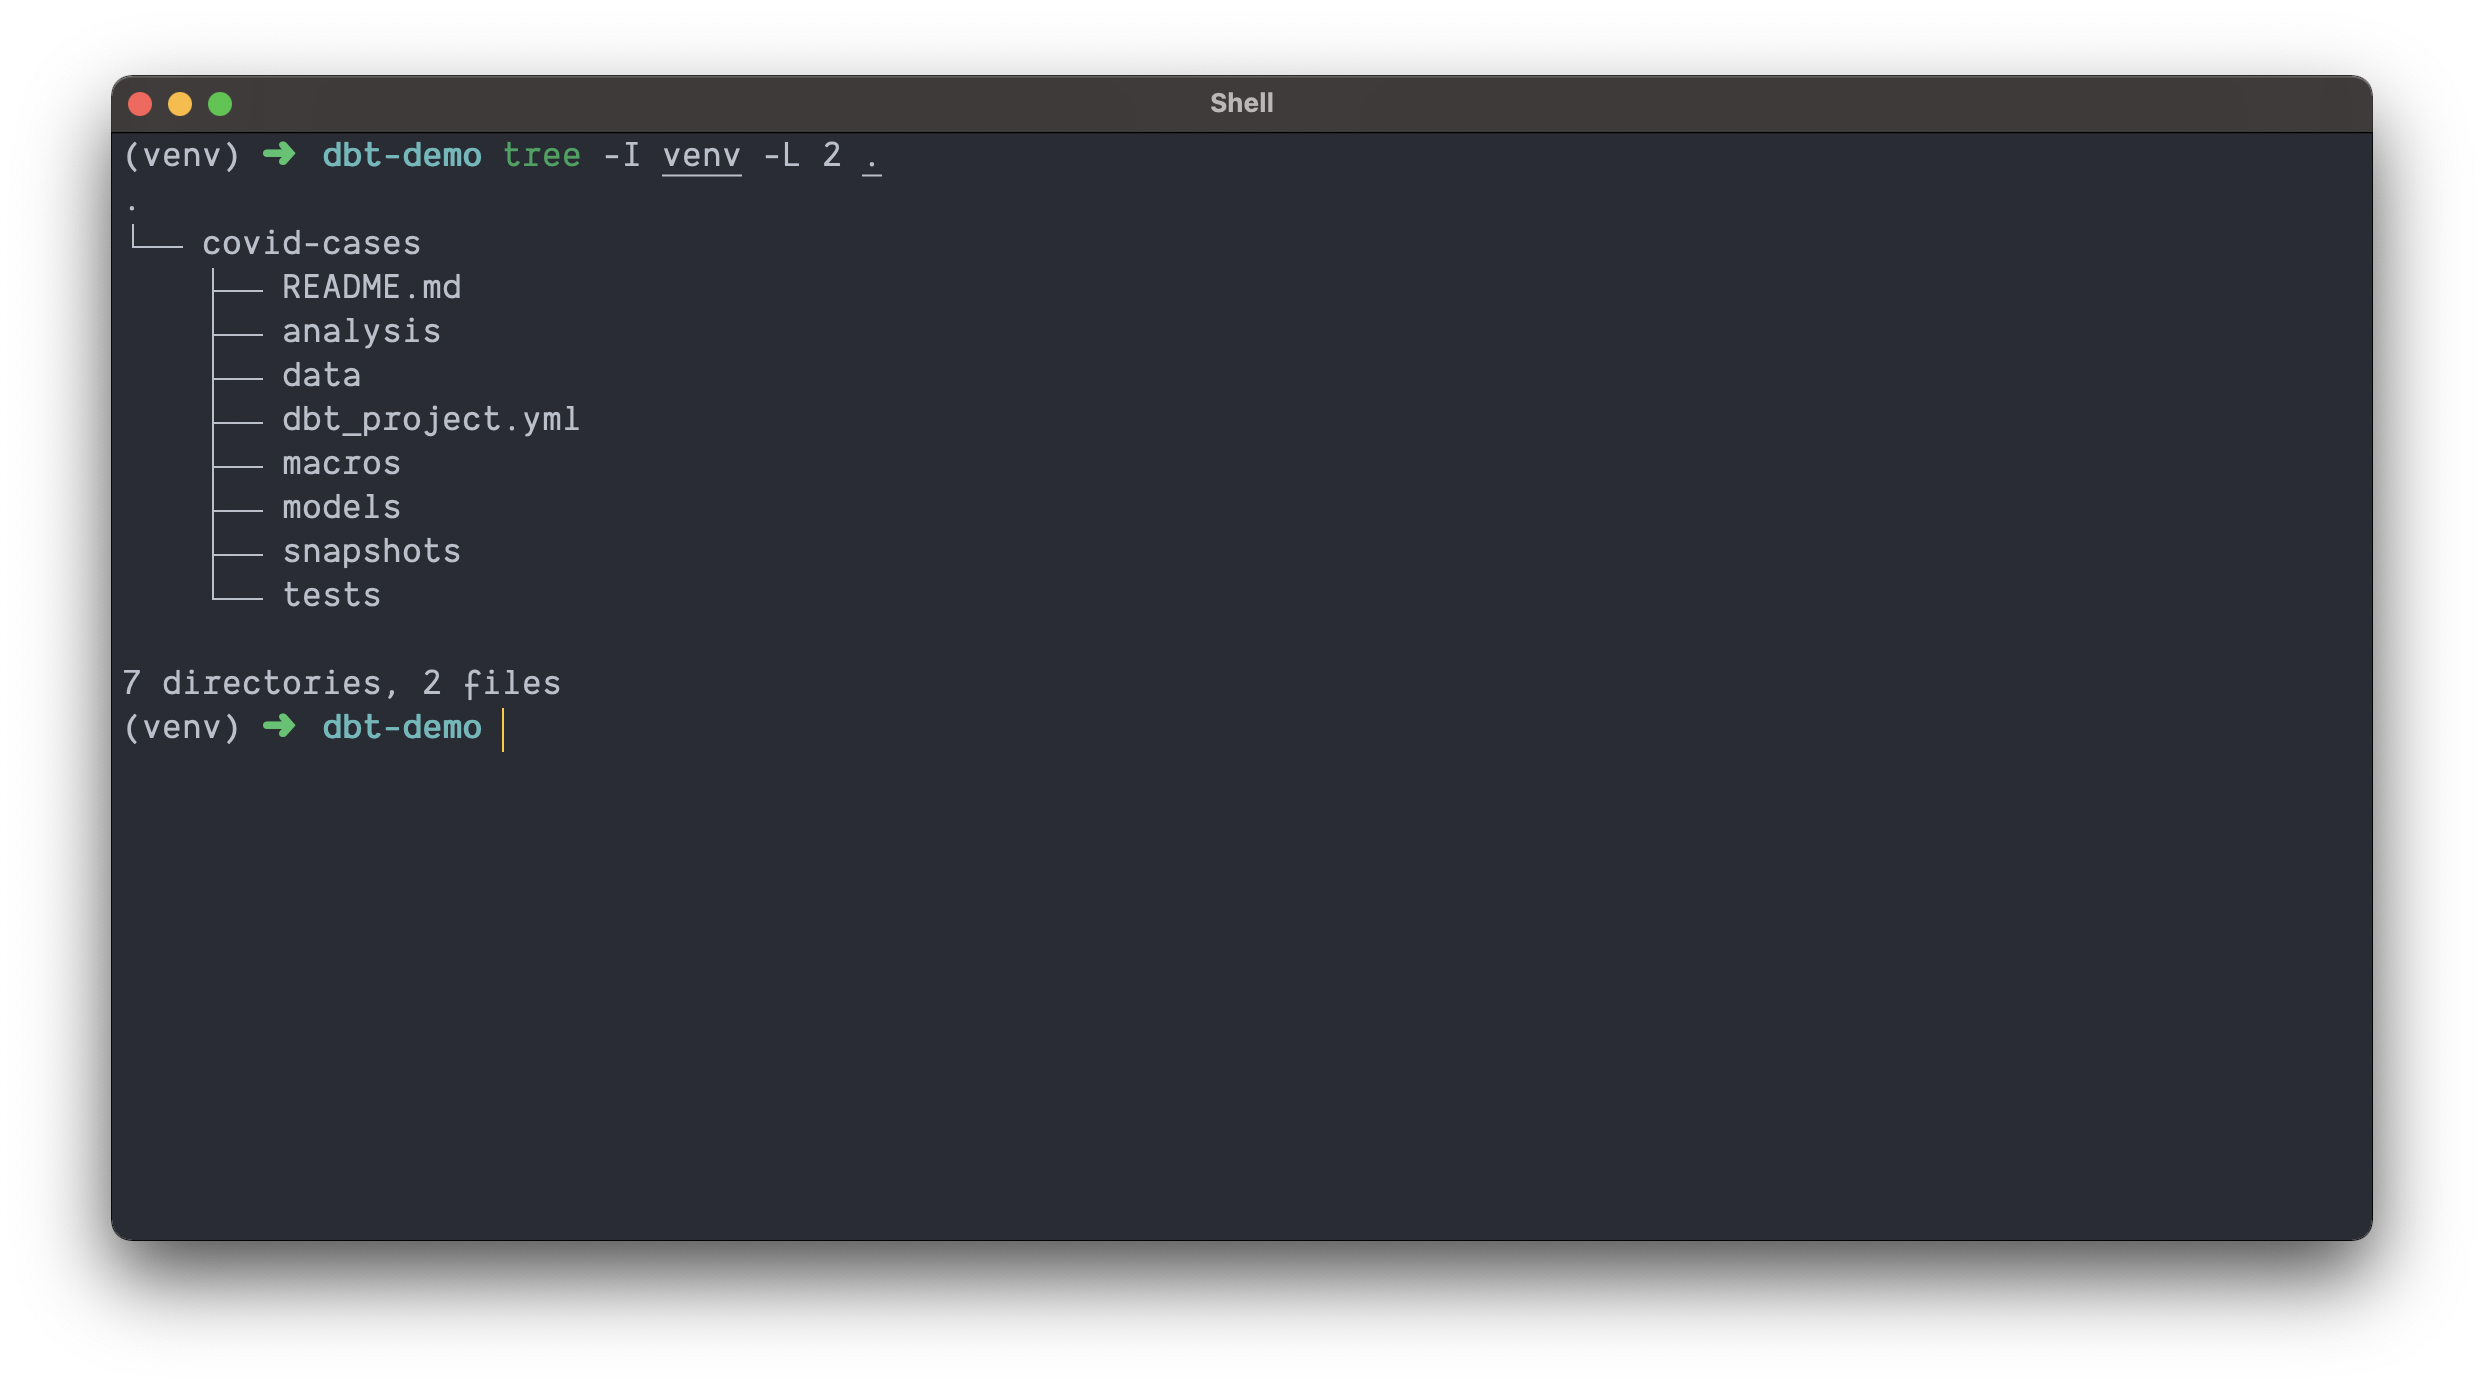
In brief,
analysis/is home for non-materialized analytical queriesdata/is home for static data, which dbt calls seeds. Version controlled CSV’s 😀!macros/is home for… macros!models/are where our SQL transformations will livesnapshots/is home for snapshot definitions (dbt can snapshot tables so you have a record of what a table looked like at any point in history)tests/is home for custom tests
Connecting to the warehouse
In order for dbt to run commands in our data warehouse, we have to give it credentials. In our case, we’re going to give dbt the Service Account key we downloaded when we setup the data warehouse. To do this, we need to create a file called profiles.yml in our project directory.
Create the covid-cases/profiles.yml file and add the contents below.
# covid-cases/profiles.yml
covid_cases:
  target: dev
  outputs:
    dev:
      type: bigquery
      method: service-account
      keyfile: "{{ env_var('DBT_GCP_BQ_KEYFILE') }}"
      project: "{{ env_var('DBT_GCP_PROJECT') }}"
      dataset: "{{ env_var('DBT_GCP_BQ_DATASET') }}"
      threads: 1
      timeout_seconds: 300
      location: US
      priority: interactive
Then on the command line we can add our environment variables.
export DBT_GCP_BQ_KEYFILE=/Users/justinwagg/Documents/keys/dbt-demo-296301-ed6fcaa09fe1.json # change to the location of your downloaded keyfile
export DBT_PROFILES_DIR=/Users/justinwagg/Projects/dbt-demo/covid-cases # change to the location of your project directory
export DBT_GCP_BQ_DATASET=dbt_justin # change to dbt_YOUR_NAME
export DBT_GCP_PROJECT=dbt-demo-296301  # change to your GCP project
💡 This approach differs from the Fishtown tutorial. This approach version controls the profiles.yml file so we can keep it with our project. We then use environment variables to provide the required values to our configuration.
You might imagine how this could be automated in an onboarding script.
Also, we might add additional targets (dev in this case) to profiles.yml, and swap our env variables with a script to assume different roles.
Before we move on and test our connection, we have to make two changes to the dbt_project.yml file in our project directory.
We need to tell dbt what connection or profile to use when connecting to the data warehouse. We can do this by modifying the profile: key (I also updated the name: key). You can see my changes below.
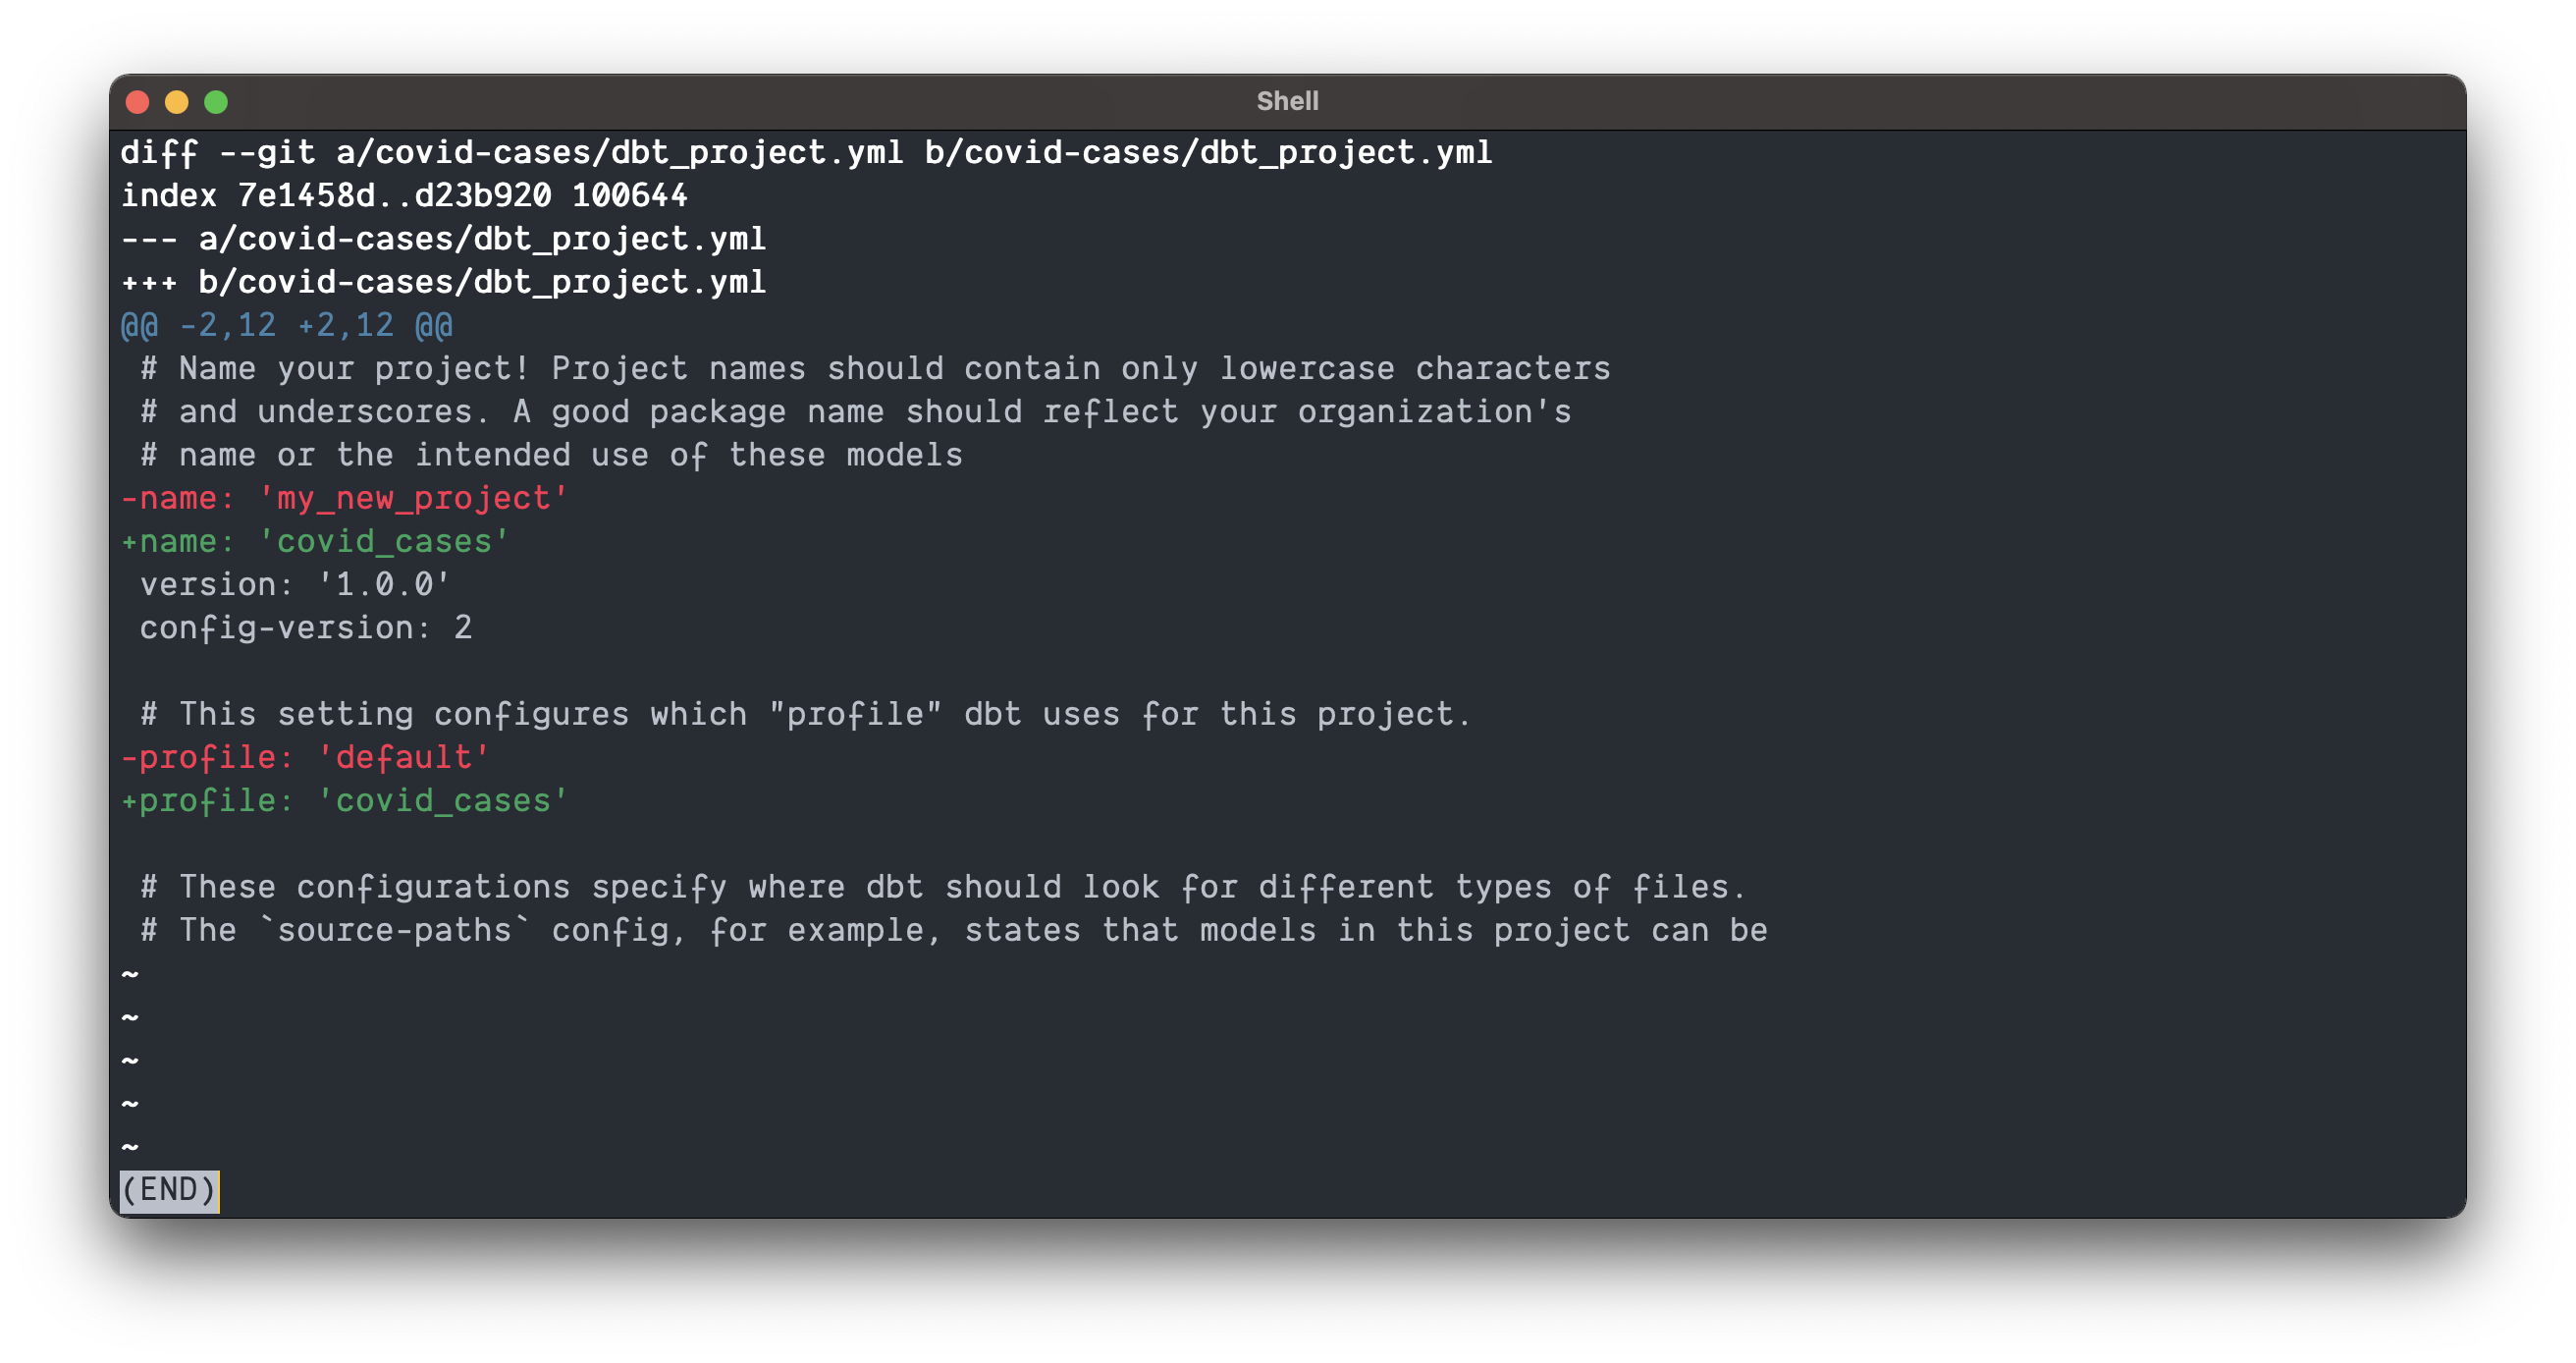
Once updated, save the file, and it’s time to test our connection!
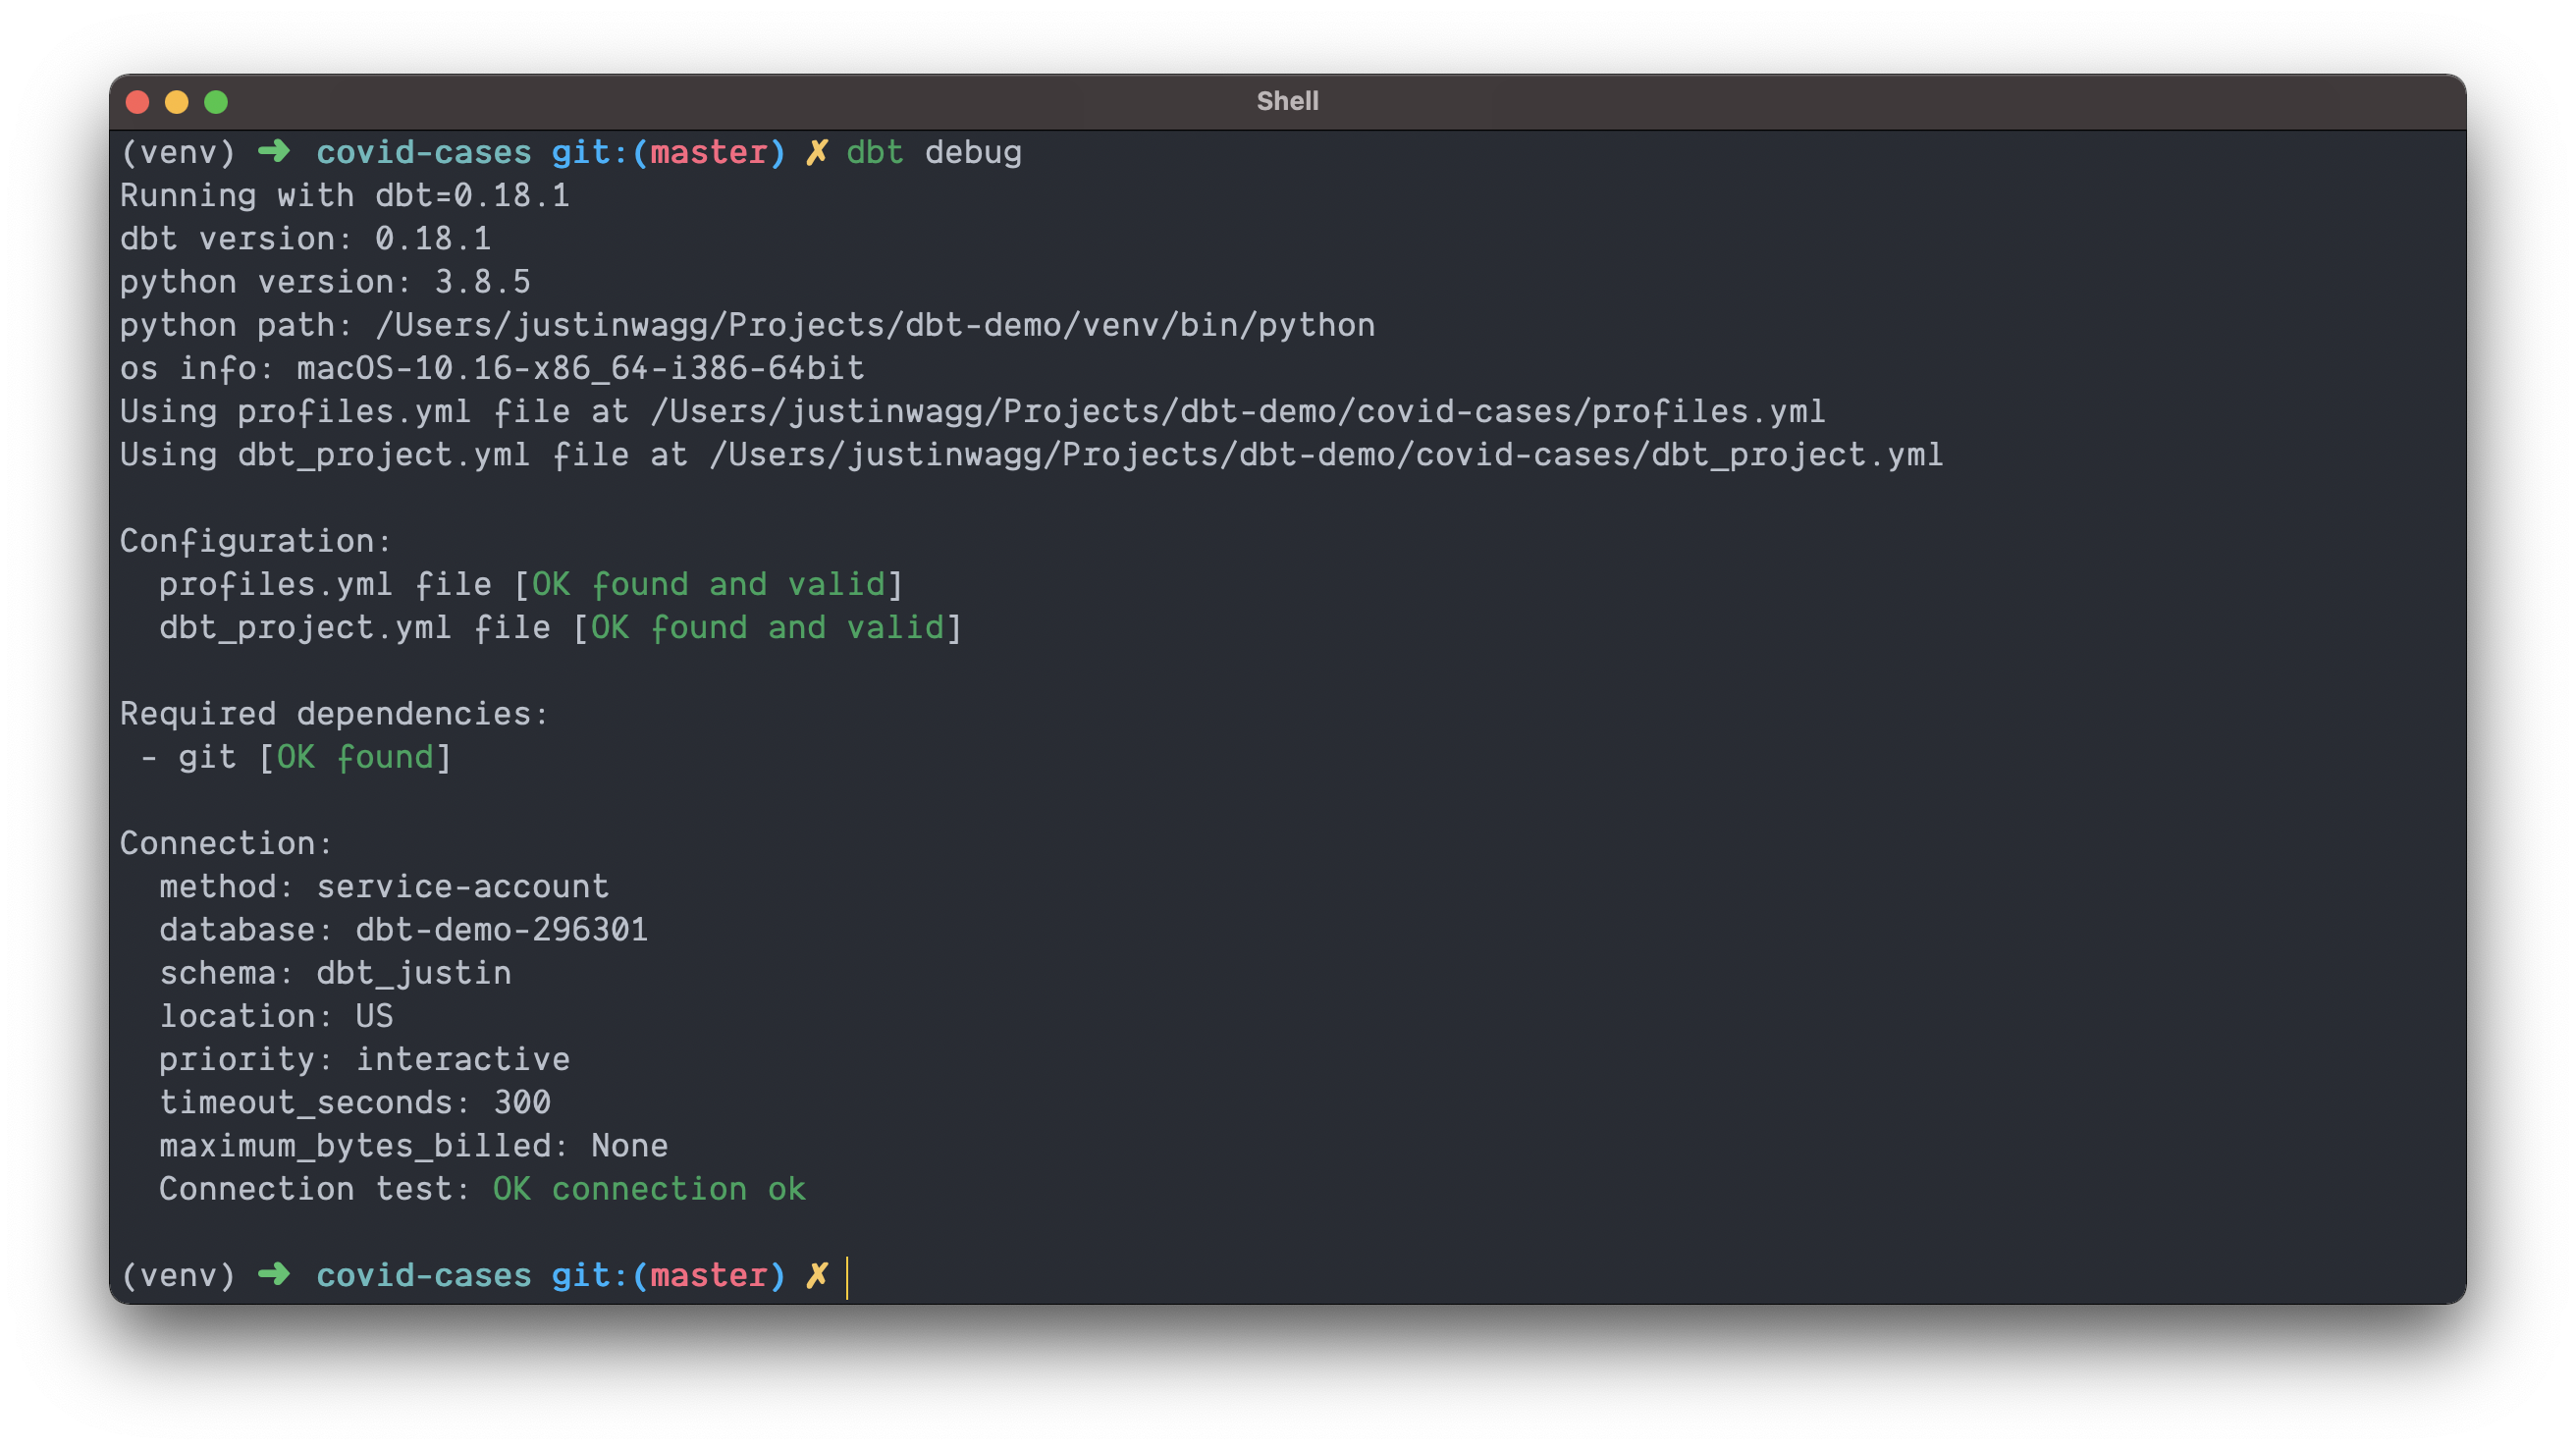
Testing our connection
dbt is going to use the credentials we just provided to connect to our warehouse and act on our data. To test our connection we can navigate into our project and run the following commands
cd covid-cases
dbt debug
If all goes as planned you should see something similar to below 💪🏼.
Let the fun times begin 🍾! So far we have
- Setup our data warehouse
- Installed dbt
- Configured dbt
- Verified we can connect to our data warehouse
Now it’s time to start exploring the awesome features of dbt.
Building a model
Now that we’re connected to our data warehouse, it’s time to do some work!
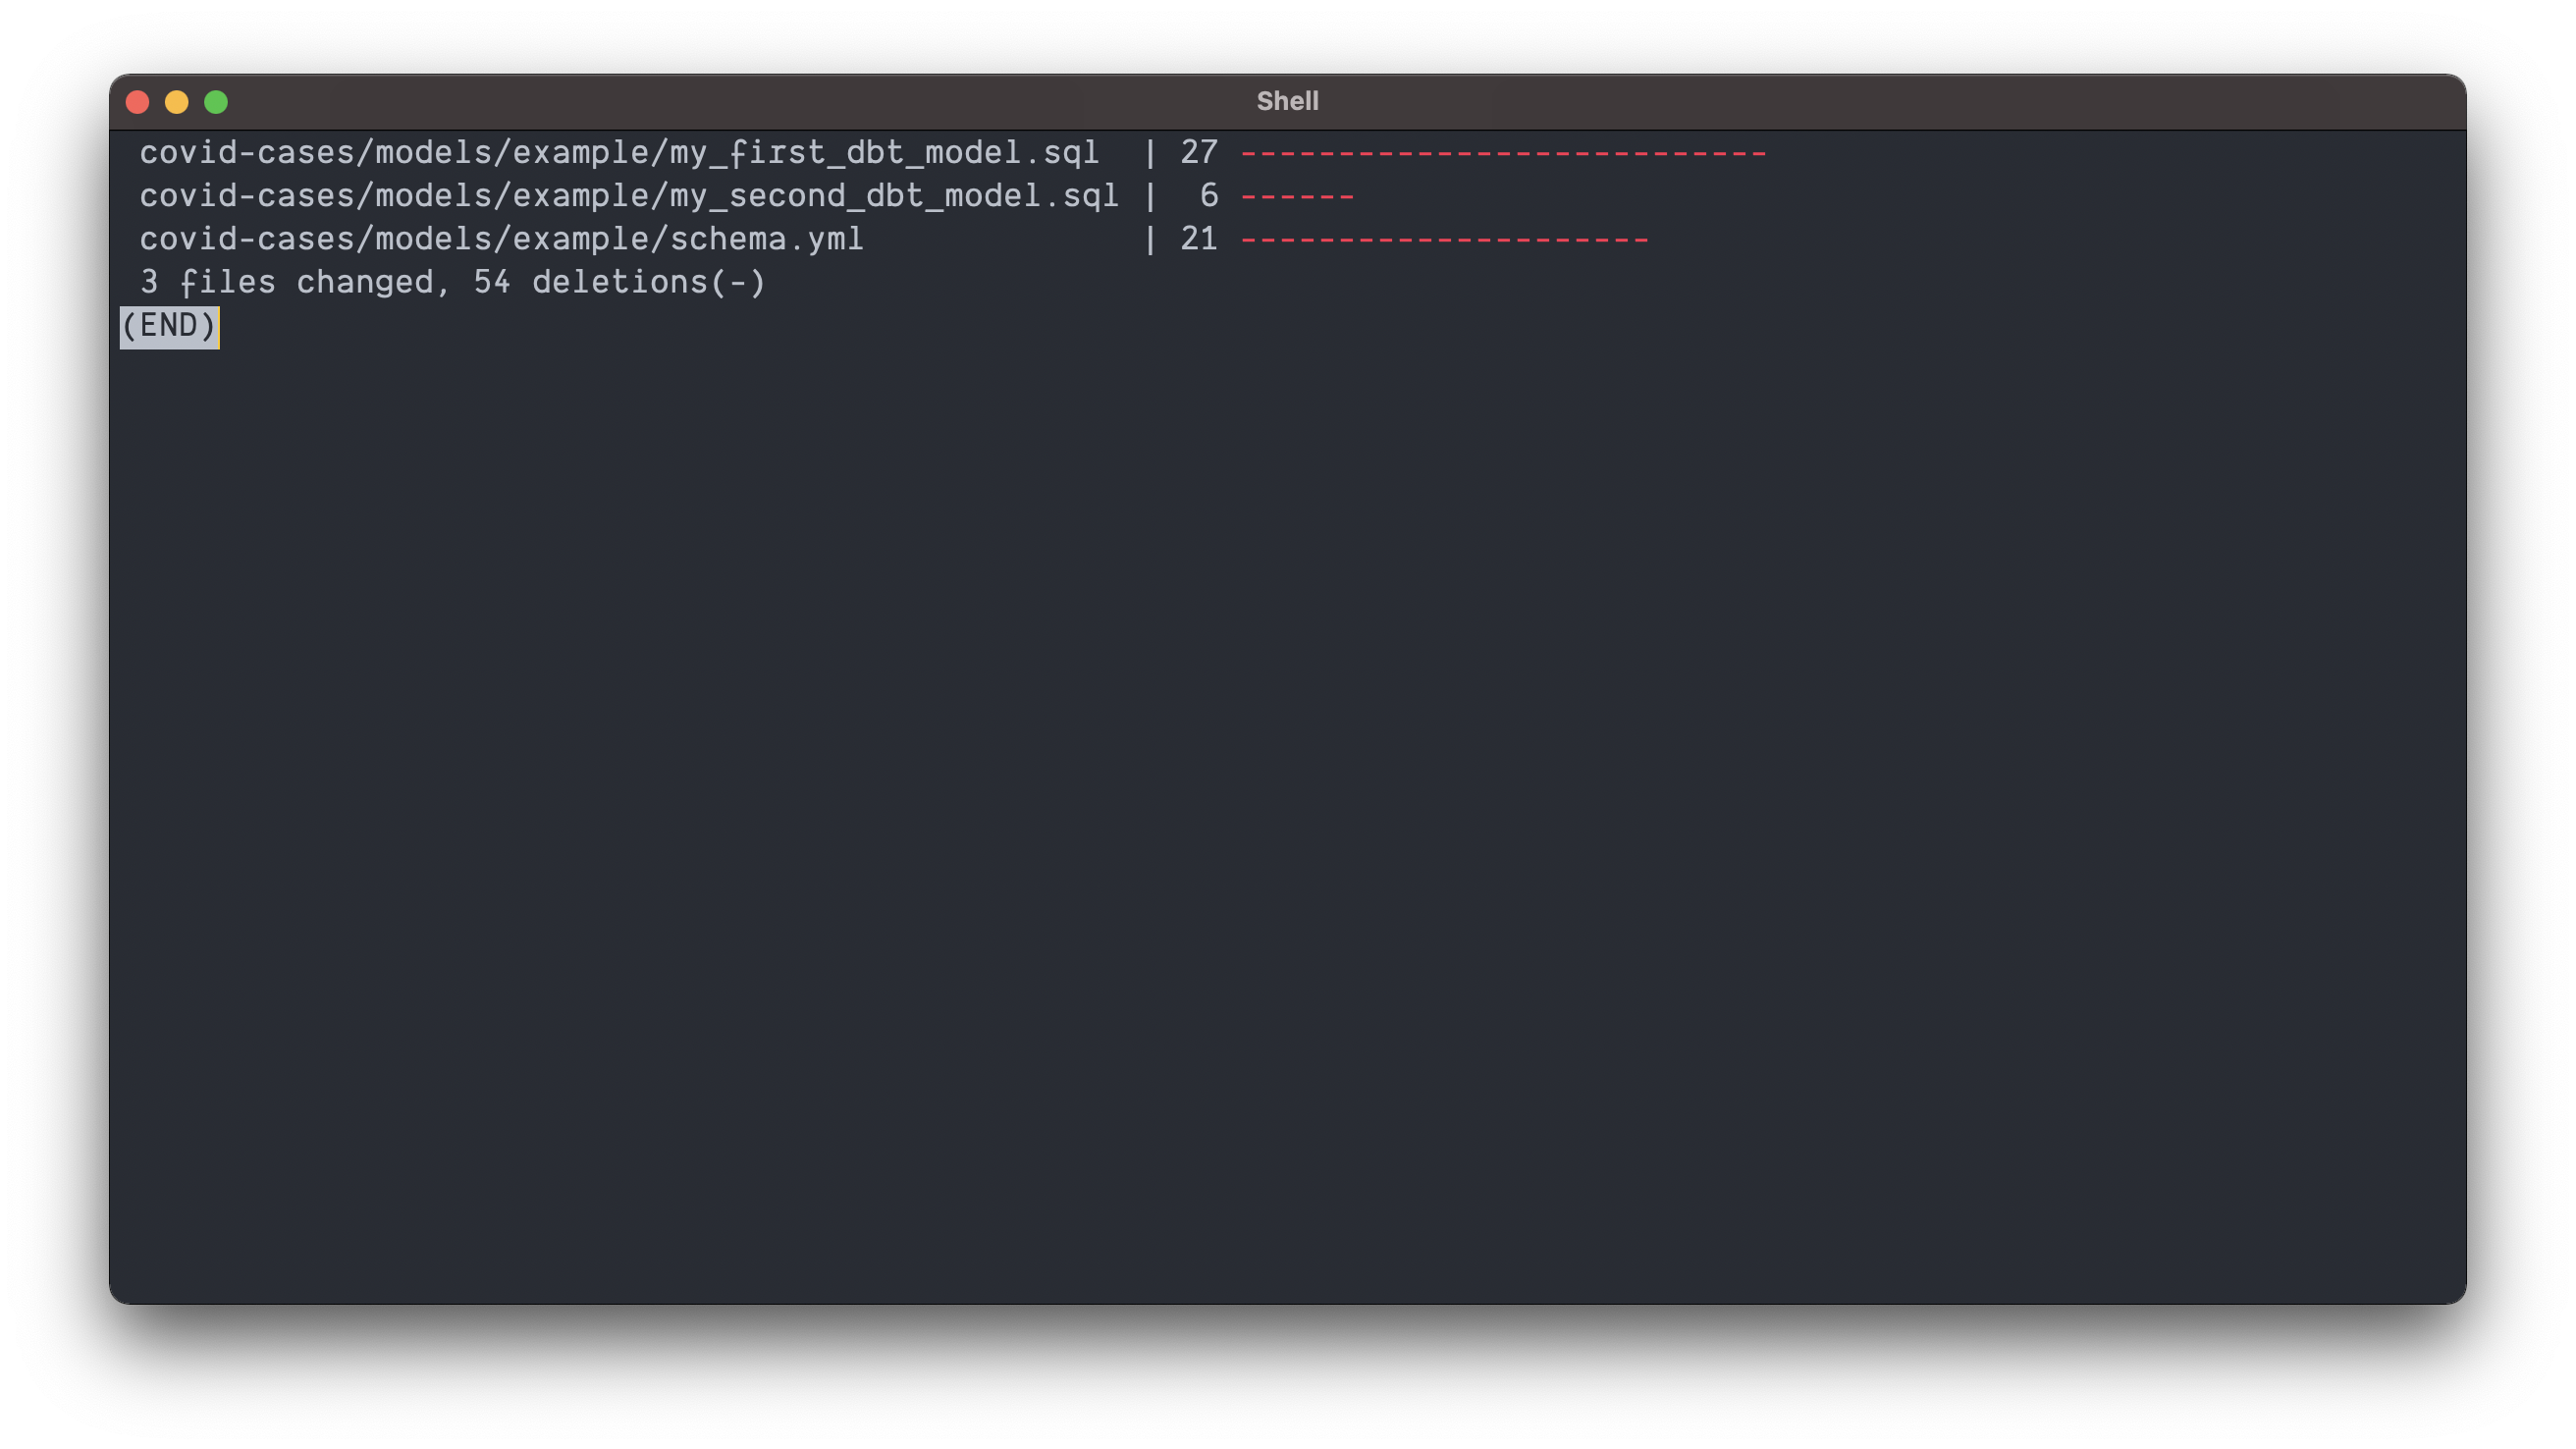
But first… let’s do some housekeeping 🧹.
Delete the two example models and the schema file that dbt provides on initialization. Removing covid-cases/models/example should remove three files as shown below
Defining a source
dbt uses the concept of sources to replace the usage of fully qualified table names. The use of sources isn’t strictly required when using dbt, but the upside far outweighs the downside.
Two benefits of defining and using sources are
- You can easily evaluate source data dependencies.
- Why is this useful? Imagine your engineering team says they’re going to deprecate a field on a backend model. How would you currently find all tables that rely on that field? Probably something like
CMD+SHIFT+F, right? Imagine being able to easily visualize those dependencies in a UI.
- Why is this useful? Imagine your engineering team says they’re going to deprecate a field on a backend model. How would you currently find all tables that rely on that field? Probably something like
- You can validate assumptions about your source data.
- Why is this useful? Before even starting to run a transformation you can validate that your source data is both fresh enough, and is of sufficient quality to warrant use. This can save you money by stopping a bad transformation before it begins.
The downside? Your SQL ends up looking slightly more foreign as you’ll see later. But, you can still compile models down to the “original” more classically recognizable SQL.
For our purposes we’re only going to use one source. We’re going to use the COVID 19 dataset from the New York Times which is conveniently in BigQuery’s public datasets.
To create our source, first make a new file called sources.yml in the project and under the models directory, and paste in the contents below.
# covid-cases/models/sources.yml
version: 2

sources:
  - name: covid19_nyt
    database: bigquery-public-data
    tables:
      - name: us_states
        columns:
          - name: date
            tests:
              - not_null
        freshness:
          warn_after: {count: 1, period: day}
          error_after: {count: 2, period: day}
        loaded_at_field: "cast(date as timestamp)"
Testing our source
In addition to defining our source we also added two ways of testing our data. One test (freshness:) ensures we get a warning or an error if our data is out of date, and the other (not_null) verifies the date column is never null.
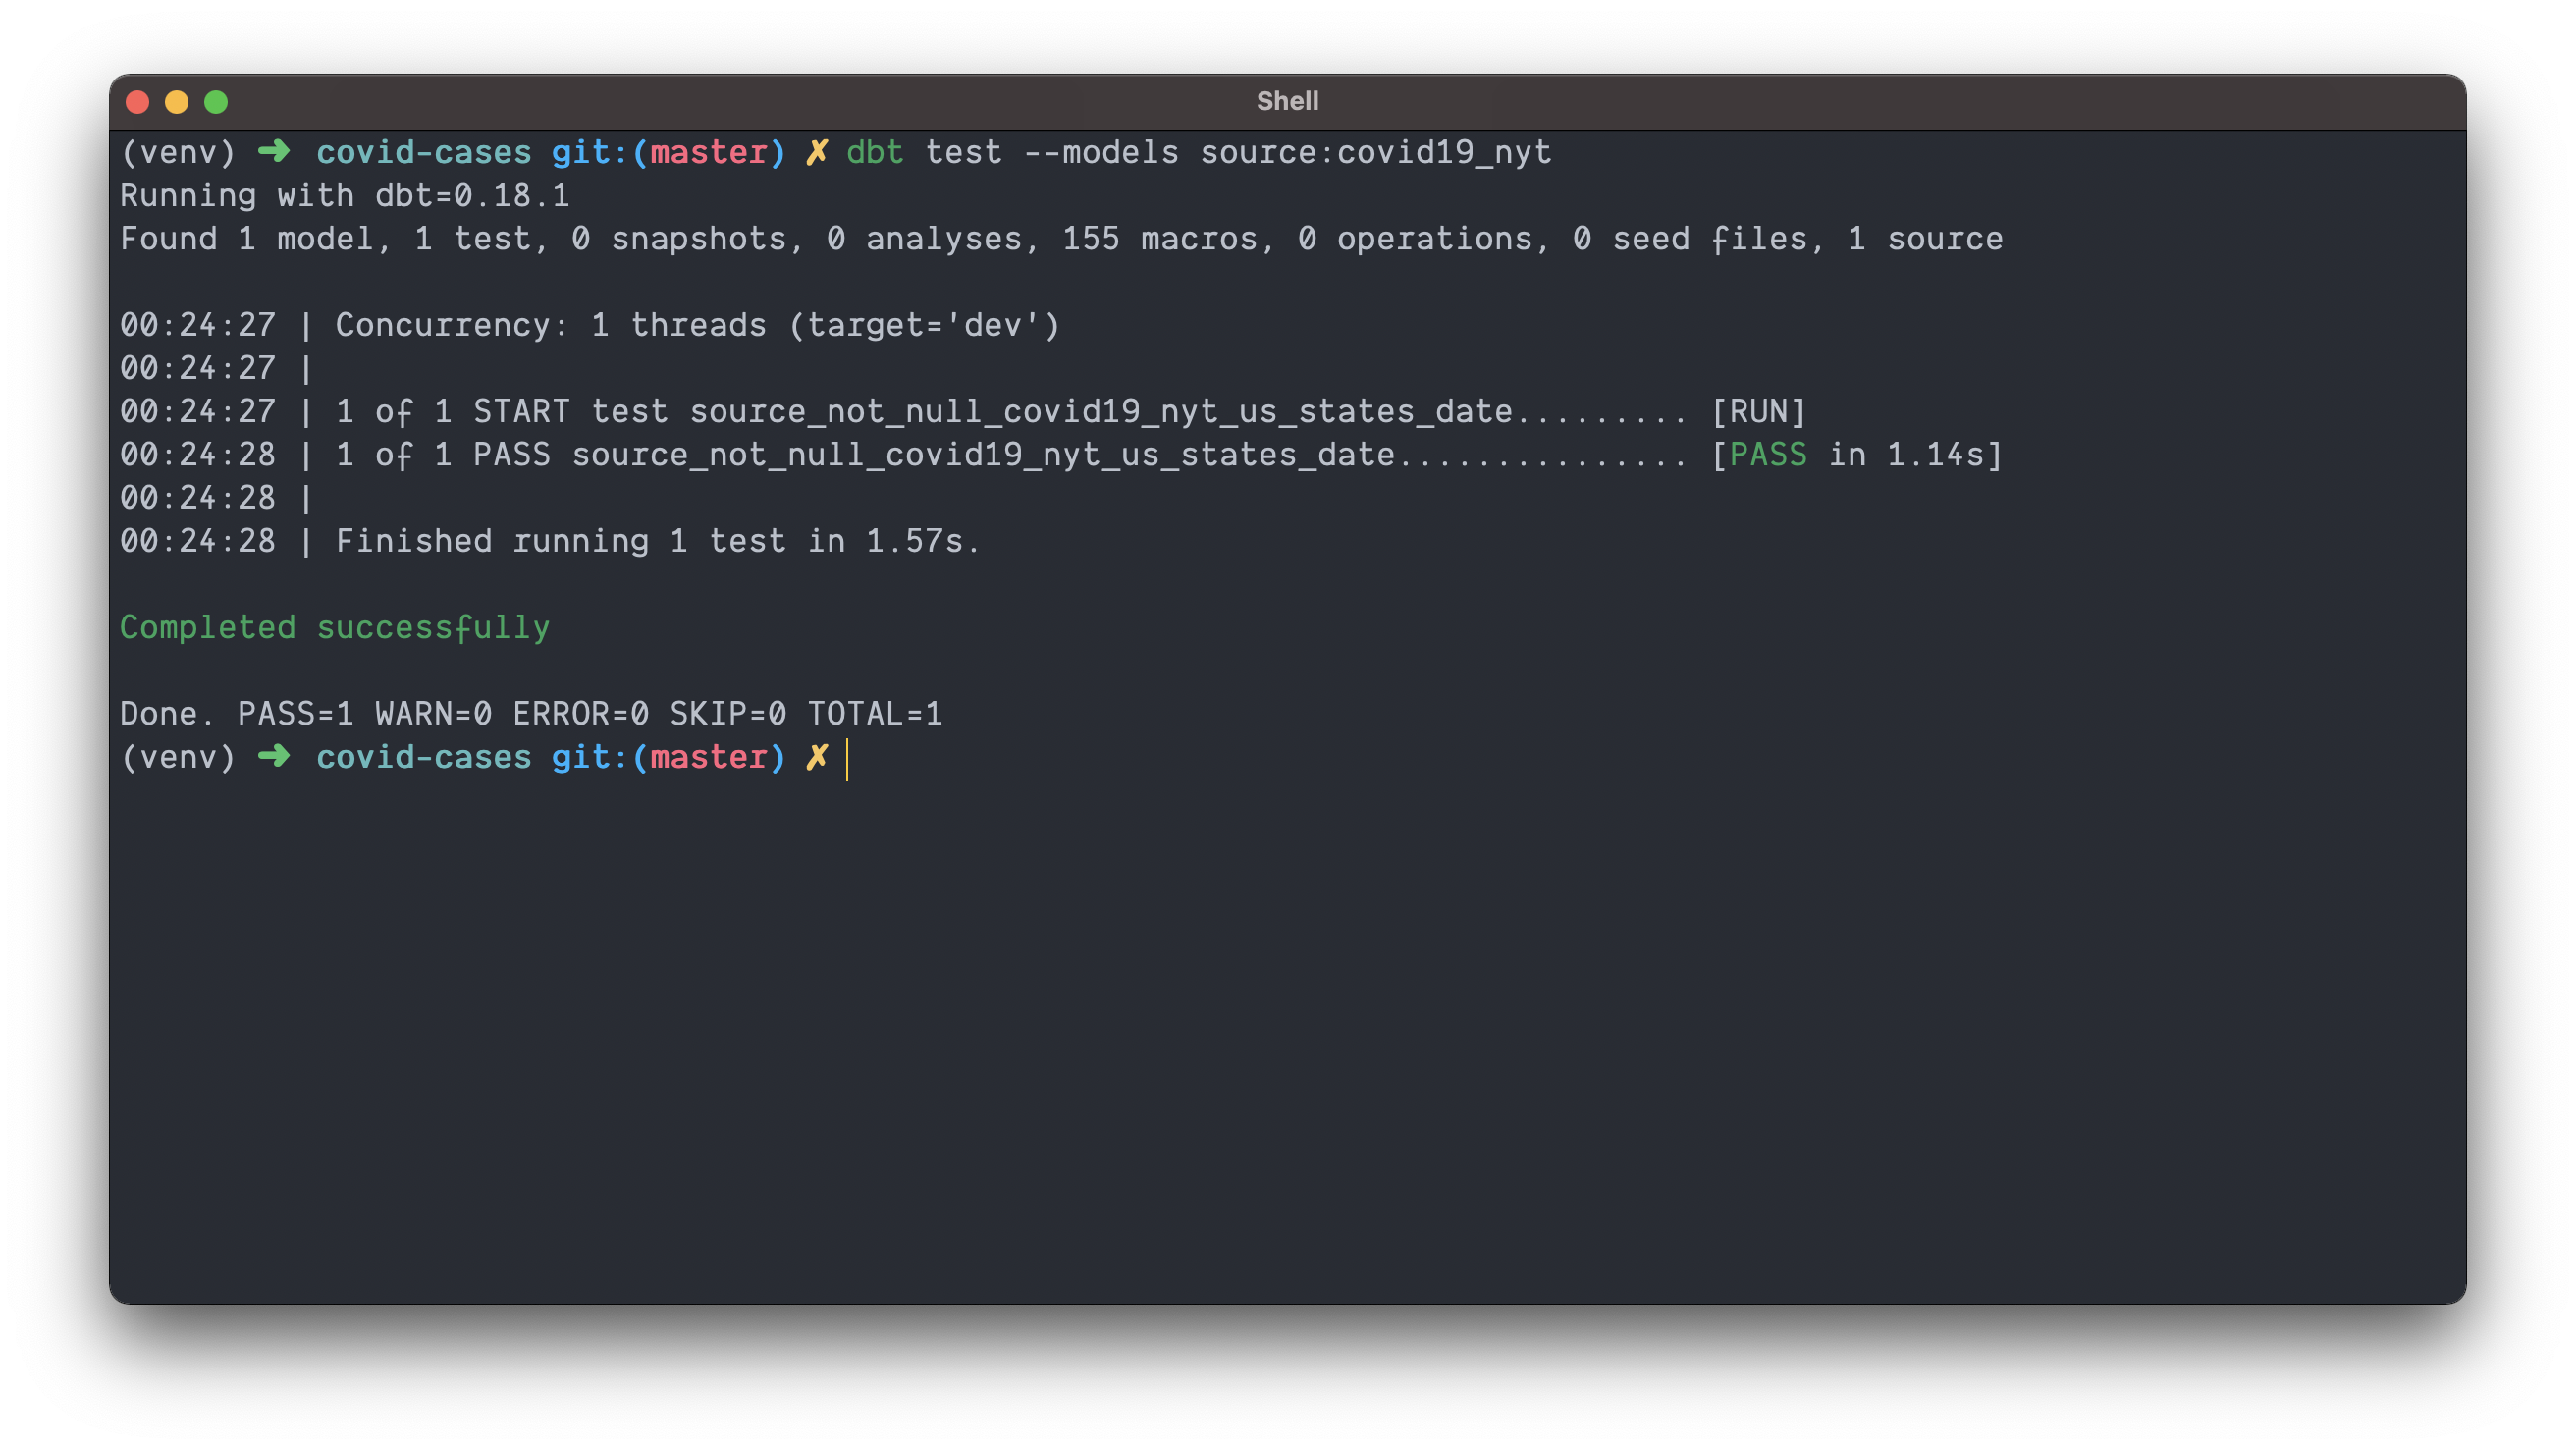
Let’s check that the date column is never null by running the following command while in the covid-cases directory.
dbt test --models source:covid19_nyt
Assuming the NYT hasn’t left any of the date fields empty, you should find a successfully run test ✅!
Now that we know our downstream jobs can rely on date being non-null, let’s check if our NYT data is fresh by running
dbt source snapshot-freshness
The results of my test indicates the data is not fresh 🥦!
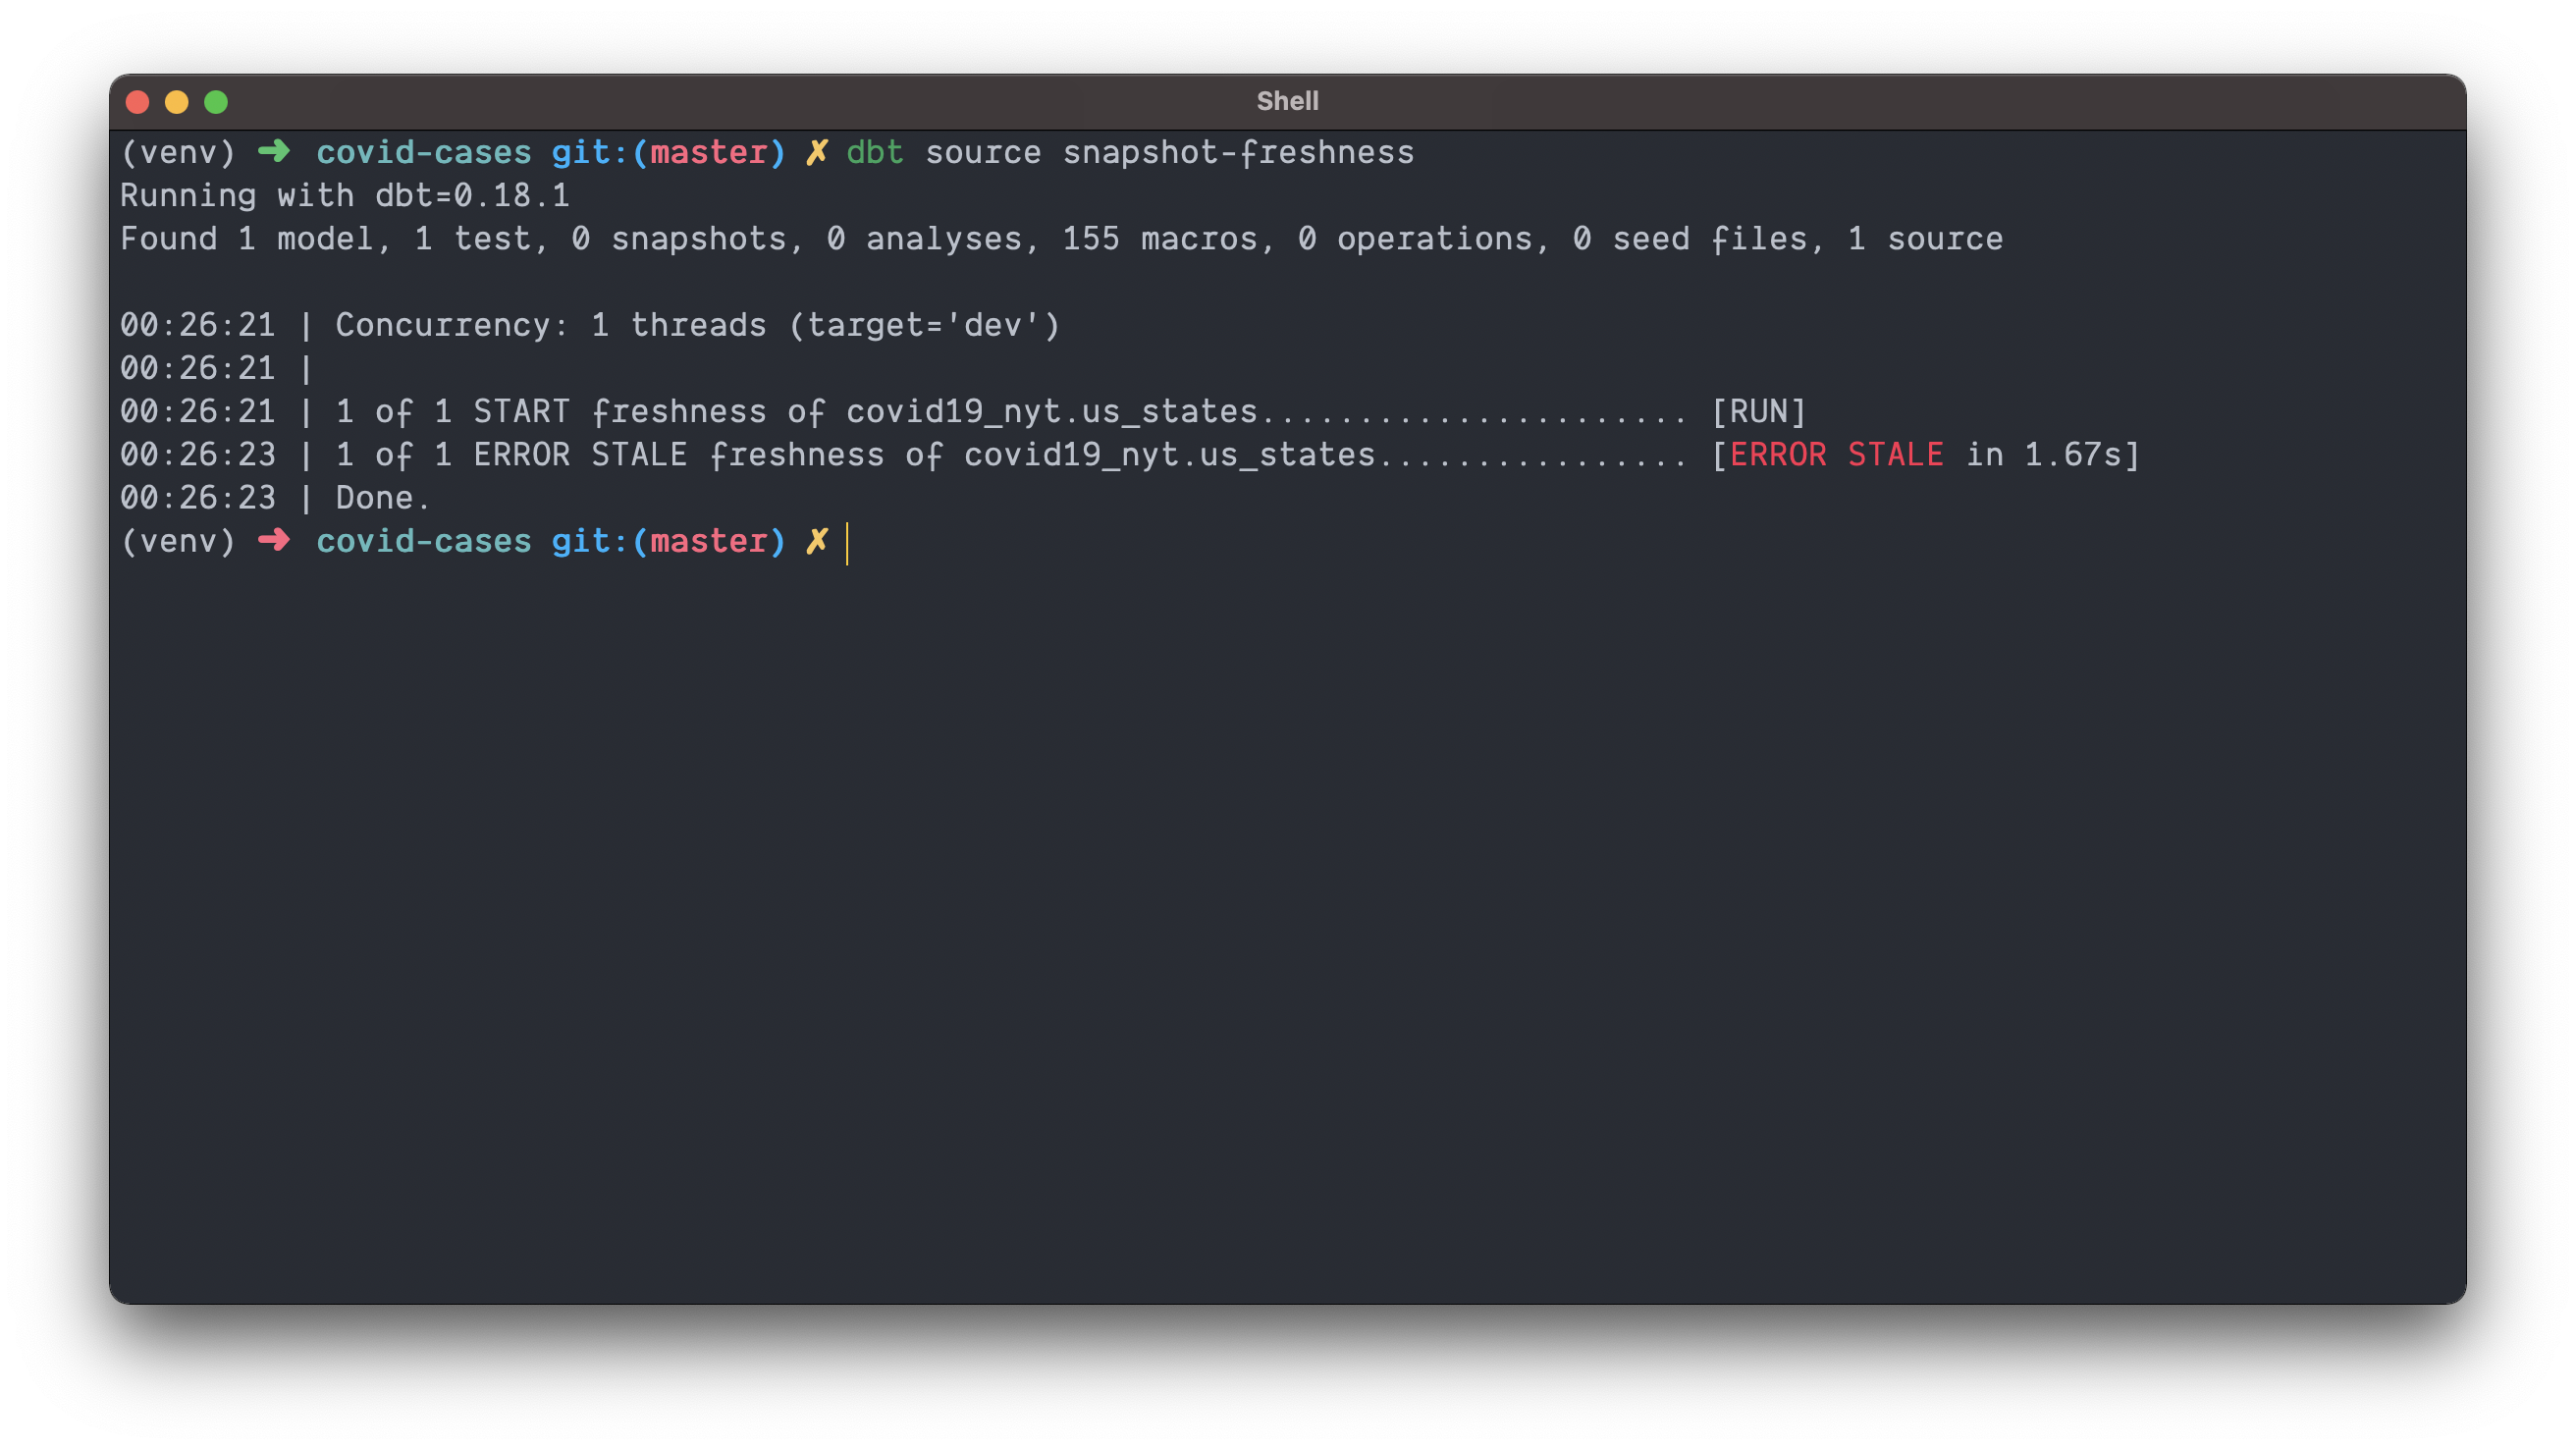
When I checked the dataset in BigQuery by running
select max(date)
from bigquery-public-data.covid19_nyt.us_states
I do see that the data is currently 2 days old!
You can extrapolate from this how we might decide to forgo downstream transformations by failing a parent pipeline because our source data hasn’t updated! That is both a cost and a time saver.
💡 There’s no sense in running a transformation if it’s just going to rewrite the same data to your table.
If an upstream team hasn’t met their SLA the resulting freshness failure can trigger an investigation into why data delays are occurring.
Defining the model
Suppose we wanted to use our COVID-19 data to create a table that would tell us:
- On each day, which state had the largest increase in the number of confirmed cases, and
- On each day, which state had the largest increase in the number of deaths?
We could do that by writing a SQL script like the one below, calling it daily_covid_state_tracker.sql and adding it under models/covid.
-- covid-cases/models/covid/daily_covid_state_tracker.sql
with daily_stats as (

  select date
  ,state_name
  ,confirmed_cases
  ,confirmed_cases - lag(confirmed_cases) over (partition by state_name order by date) as incremental_cases
  ,deaths
  ,deaths - lag(deaths) over (partition by state_name order by date) as incremental_deaths
  from {{ source('covid19_nyt', 'us_states') }}

)
,daily_ranks as (

  select *
  ,dense_rank() over (partition by date order by incremental_cases desc, state_name) as incremental_cases_rank_desc
  ,dense_rank() over (partition by date order by incremental_deaths desc, state_name) as incremental_deaths_rank_desc
  from daily_stats

)

select date
,state_name
,'incremental_cases' as metric
,incremental_cases as value
from daily_ranks
where incremental_cases_rank_desc = 1

UNION ALL

select date
,state_name
,'incremental_deaths' as metric
,incremental_deaths as value
from daily_ranks
where incremental_deaths_rank_desc = 1
Notice how we didn’t write any CREATE OR REPLACE TABLE commands around our transformtion! dbt will take care of that for us at runtime!
👀 A keen eye will notice something fishy (🙊 pun on Fishtown) about our model.
Instead of writing
from bigquery-public-data.covid19_nyt.us_states
we wrote
from {{ source('covid19_nyt', 'us_states') }}
Part of the power of defining and using sources is that we don’t have to write the fully qualified table name. It also tells dbt that this model now depends on the NYT COVID-19 source dataset, and we’ll be able to see that in the docs site. This is a win for big warehouses with complex dependency graphs and makes visualizing that graph easy.
💡 This also means we could dynamically switch projects depending on what environment we’re in.
We chose to define the project our source data lives in when we created the source. We did that by adding the line database: bigquery-public-data.
If you omit this, dbt will search in the target database defined in the covid-cases/profiles.yml file (for me that’s dbt-demo-296301) for our dataset.
This is really handy if you have partial or a staging data in a staging project.
Organizing the project
I like to arrange SQL scripts by schema under the models/ directory. Doing so results in a clean structure like below
./models
├── schema1
│   ├── table1.sql
│   ├── table2.sql
│   └── view1.sql
└── schema2
     ├── table1.sql
     └── view1.sql
In certain circumstances I will break that rule if one set transformation gets too big.
dbt uses the name of your sql script as a table or view name. Based on our setup, dbt will write its materializations to the dbt_justin schema (for me) but it can also be configured to use custom schemas depending on your environment (more on that here).
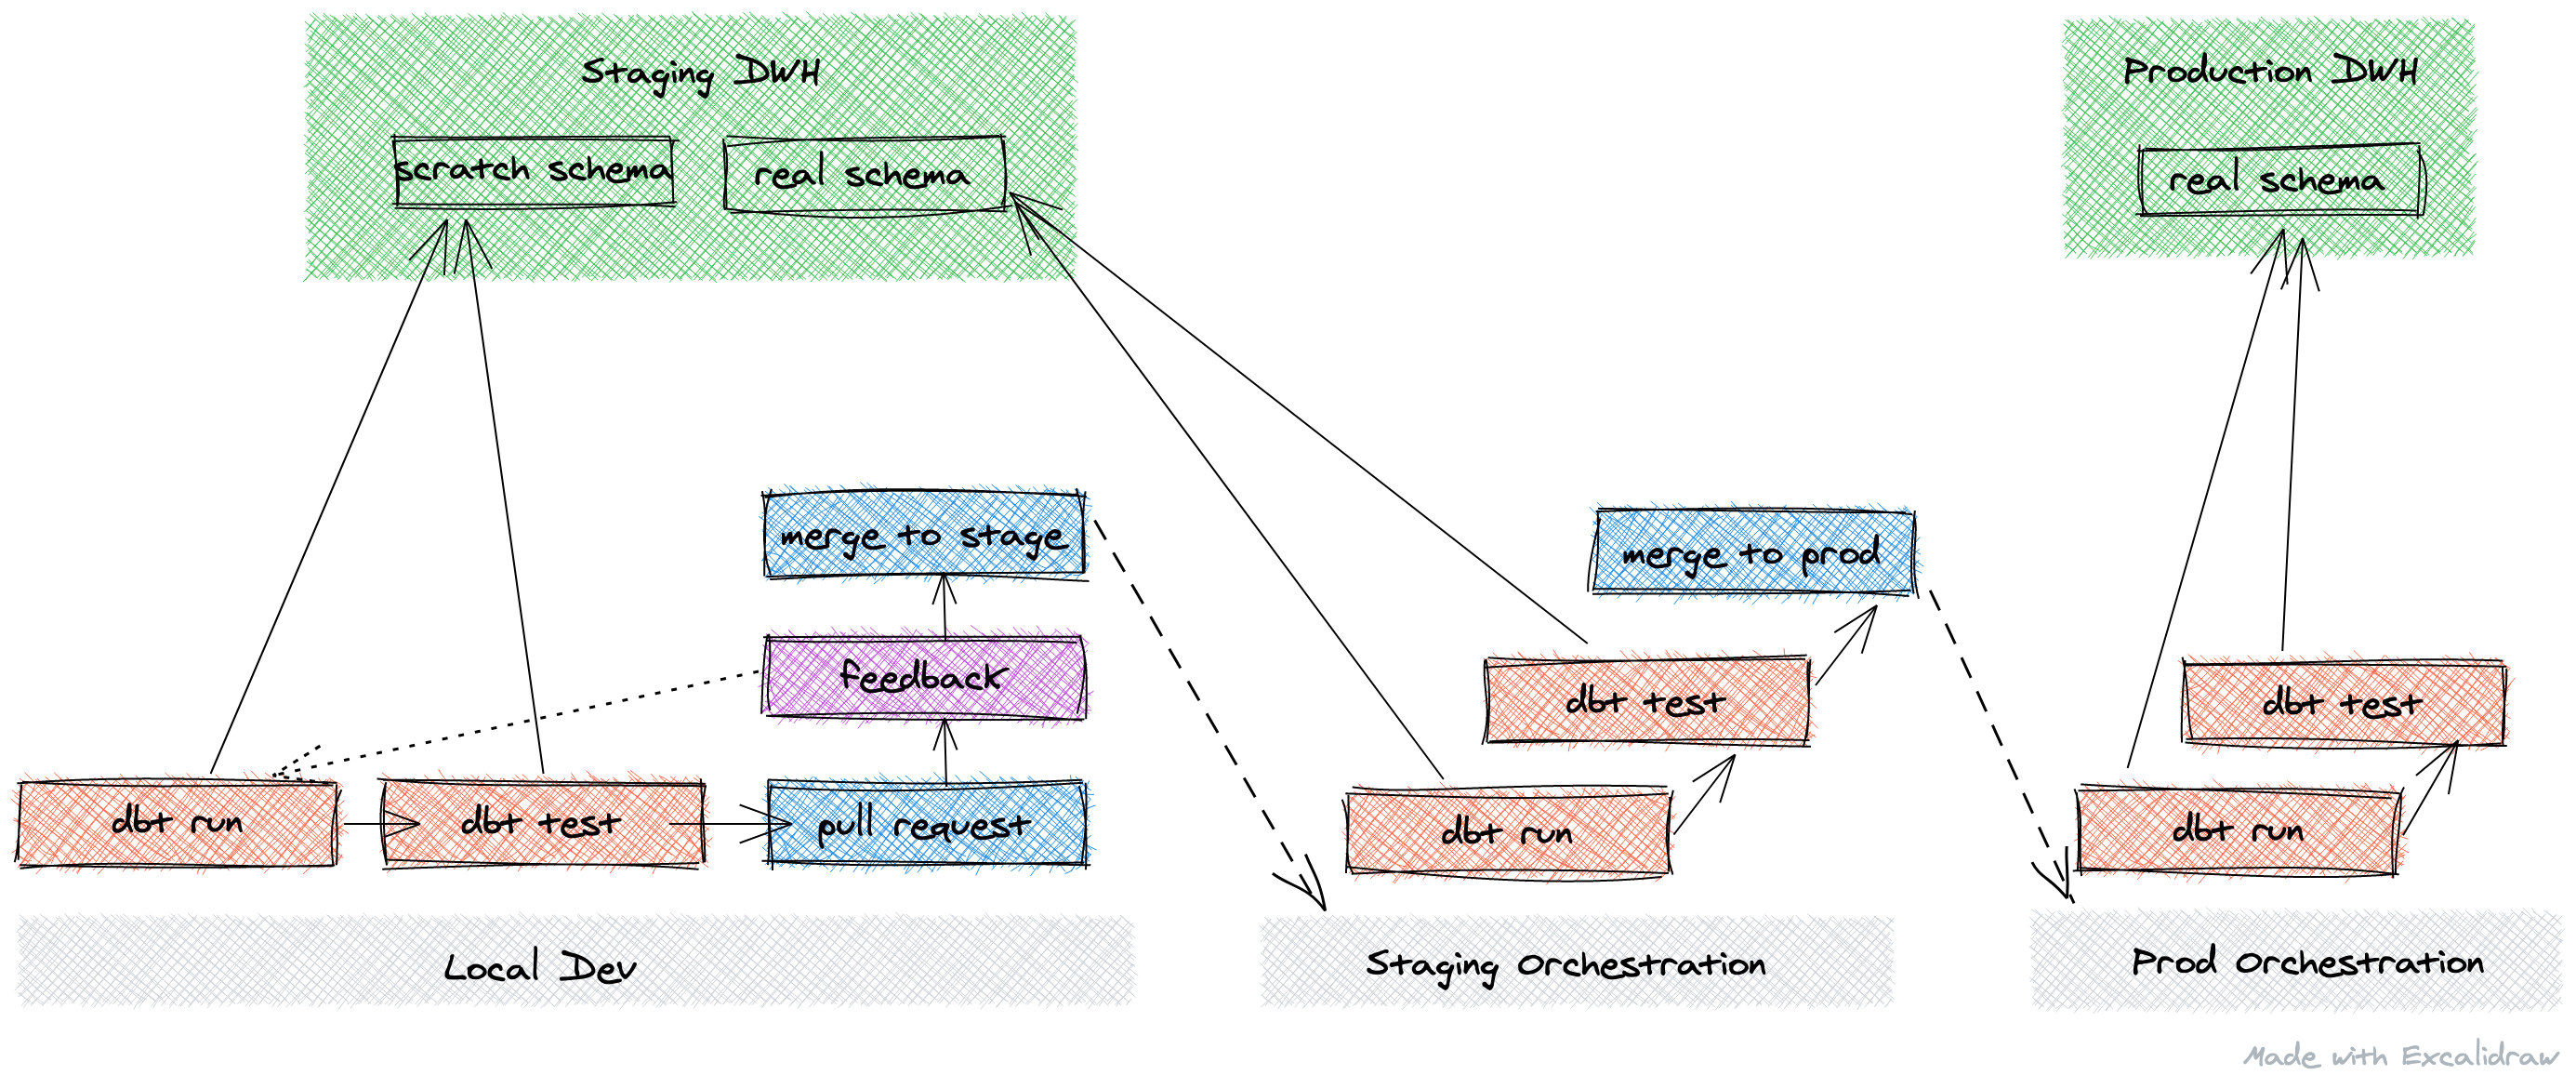
In practice, I like to organize schemas by environment like below (using our covid schema as an example).
| environment | project | schema name |
|---|---|---|
| dev | staging | dbt_justin |
| staging | staging | covid |
| production | production | covid |
This way,
- In development all models write to a dbt “scratch” schema per analyst/engineer (like
dbt_justin), - In staging, where an orchestration software such as Airflow is running and testing your transforms, models will be written to the same schema as production, but in the staging project
- In production, once your transforms are tested and vetted, the project is swapped to production
This way staging and prod match but live in different projects. In practice, that might look something like this.
Documenting the model
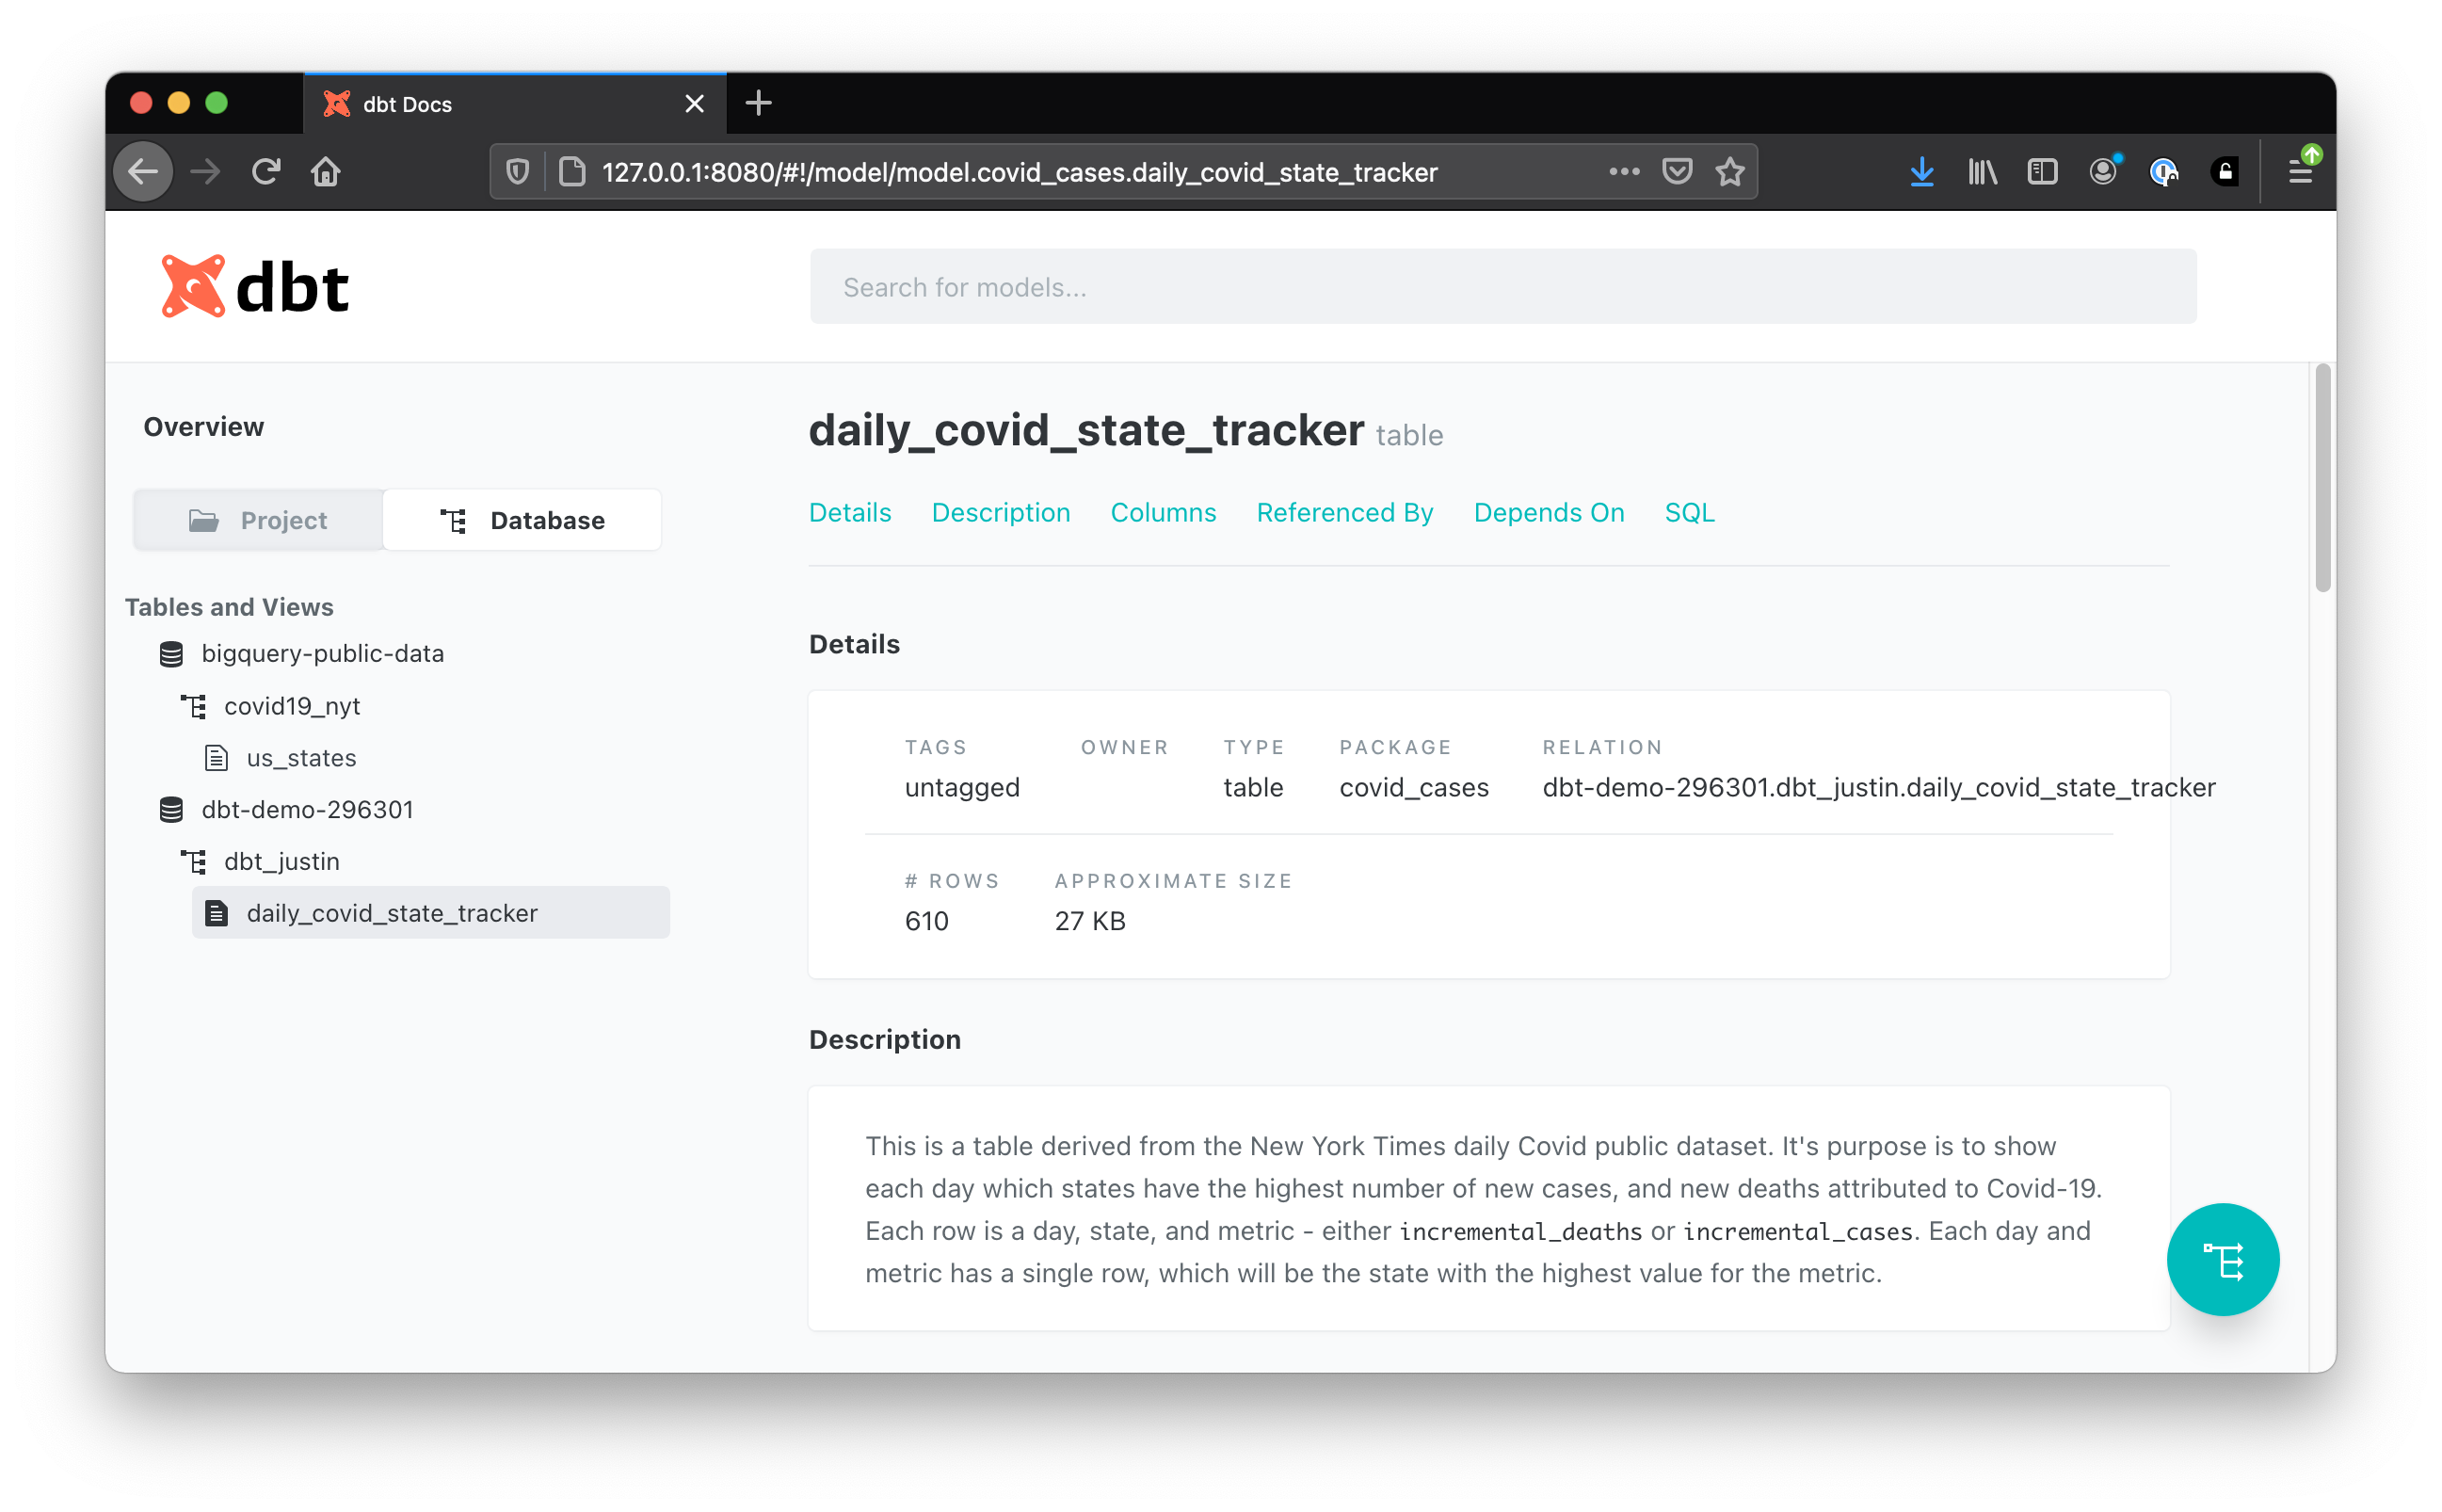
Before we run our model, let’s add documentation so that everyone else (and future you) can understand what this data means and how it works.
We can do that by adding a file called covid.yml under covid-cases/models/covid/ with the contents below.
# covid-cases/models/covid/covid.yml
version: 2

models:
  - name: daily_covid_state_tracker
    description: >
        This is a table derived from the New York Times daily COVID public dataset.
        It's purpose is to show each day which states have the highest number of new cases, and new deaths attributed to COVID-19.
        Each row is a day, state, and metric - either `incremental_deaths` or `incremental_cases`.
        Each day and metric has a single row, which will be the state with the highest value for the metric.
    columns:
      - name: date
        tests:
            - not_null
covid-cases/models/), but I prefer to split documentation per schema. This helps avoid huge files if you have many models and keeps the documentation a little closer to where your model is stored. If you move models around to new folders though, you’ll probably want to move your documentation as well.In addition to our description, which we’ll explore later in the dbt docs site, I also added a test. The test makes sure that daily_covid_state_tracker.date is never null. This is a superfluous test, but for examples sake it serves its purpose.
Defining model materialization
We’re almost there ⌛️!
Before we move on and run our first model we need to do one more thing.
We need to tell dbt how to materialize our model in the database. You can choose from a number of materializations but for our example I’m going to tell dbt to create a table from our model.
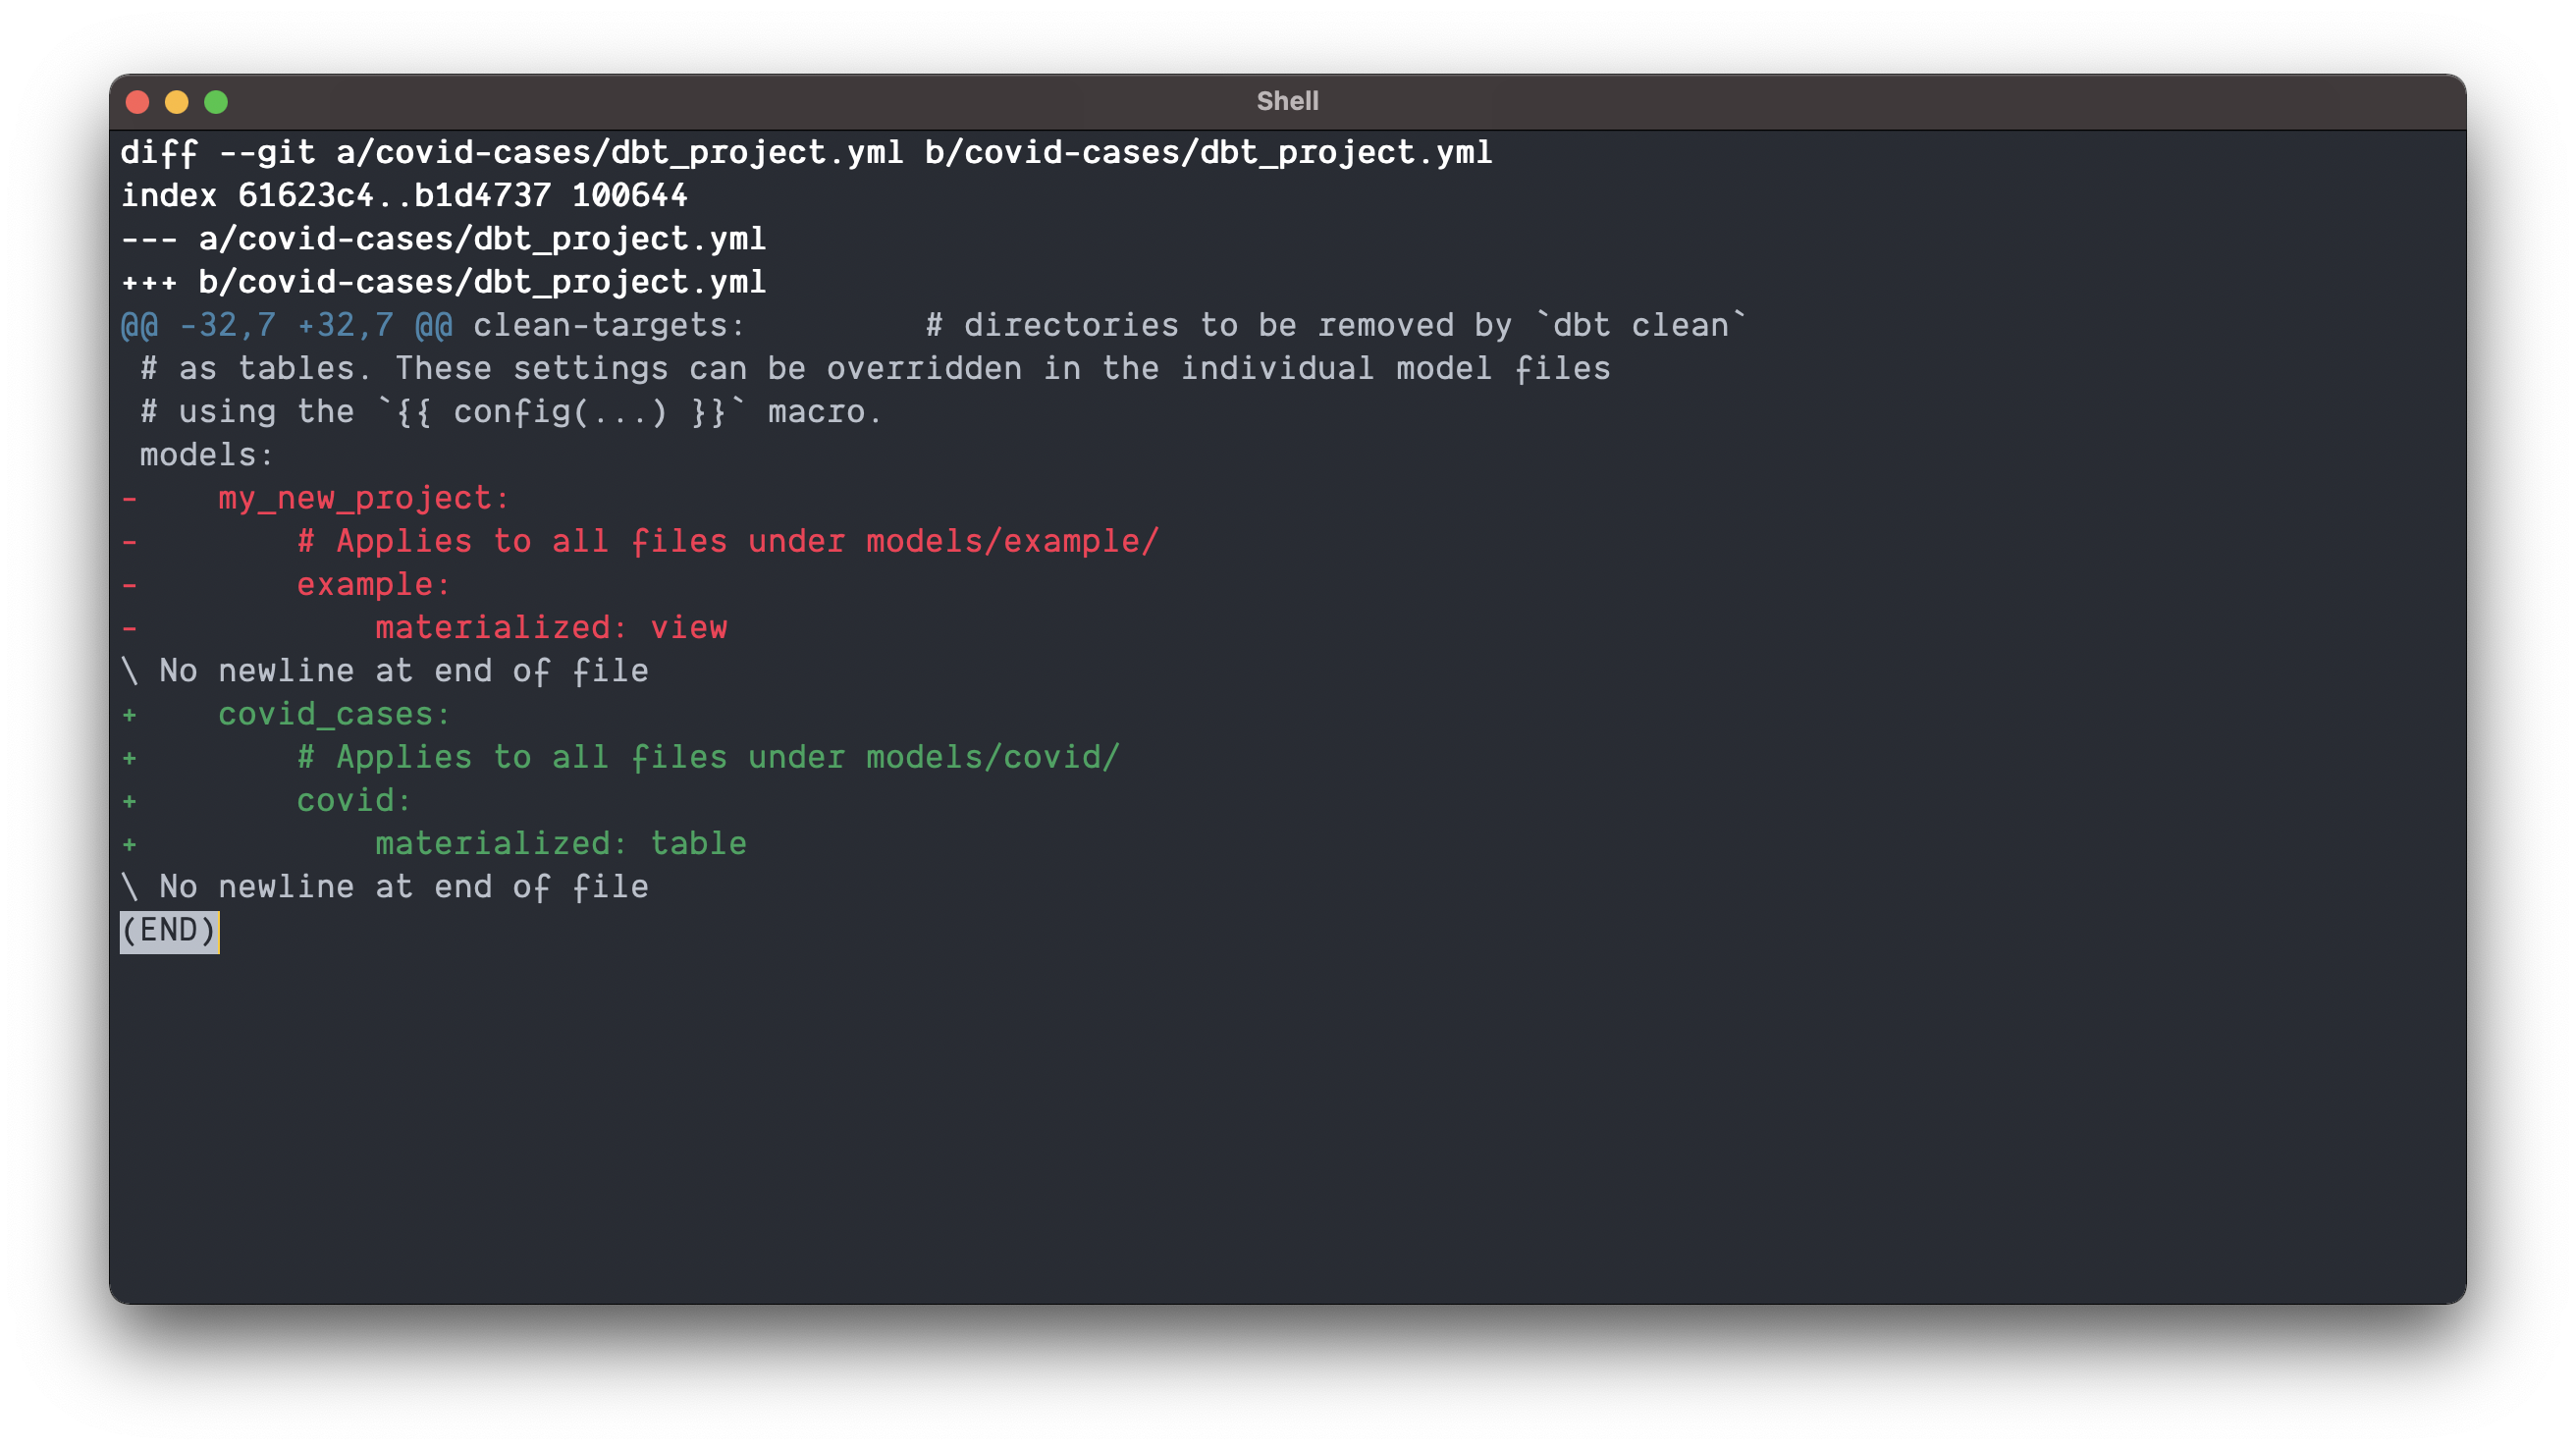
Modify your covid-cases/dbt_project.yml file by overwriting the model portion of the file at the bottom with the following
models:
    covid_cases:
        # Applies to all files under models/covid/
        covid:
            materialized: table
incremental materialization makes updating tables (think update/insert) instead of overwriting a snap. This feature has saved me a ton of time and effort (and cost). Switching from a overwrite strategy to an update is as simple as adding a few lines of configuration so dbt knows the primary key of your model. It is also nice to be able to switch from view, to table, to incremental as your data grows!Running the model
It’s finally time to run our model 🏃🏼♀️! To recap what we’ve done so far, we’ve
- Setup our data warehouse
- Installed dbt
- Configured dbt
- Connected to our data warehouse
- Defined and tested our NYT source data
- Defined a business question
- Written a model to answer the question
- Documented the model so future you knows what this data is
- Told dbt to materialize this model as a table
For all that work, running our model is really simple. All it takes is one command
dbt run -m covid
Like magic 🪄, our table is created! You should see output on the command line from dbt telling you where it has written the model, how much data was processed, and how long the process took. The next step is to test our model.
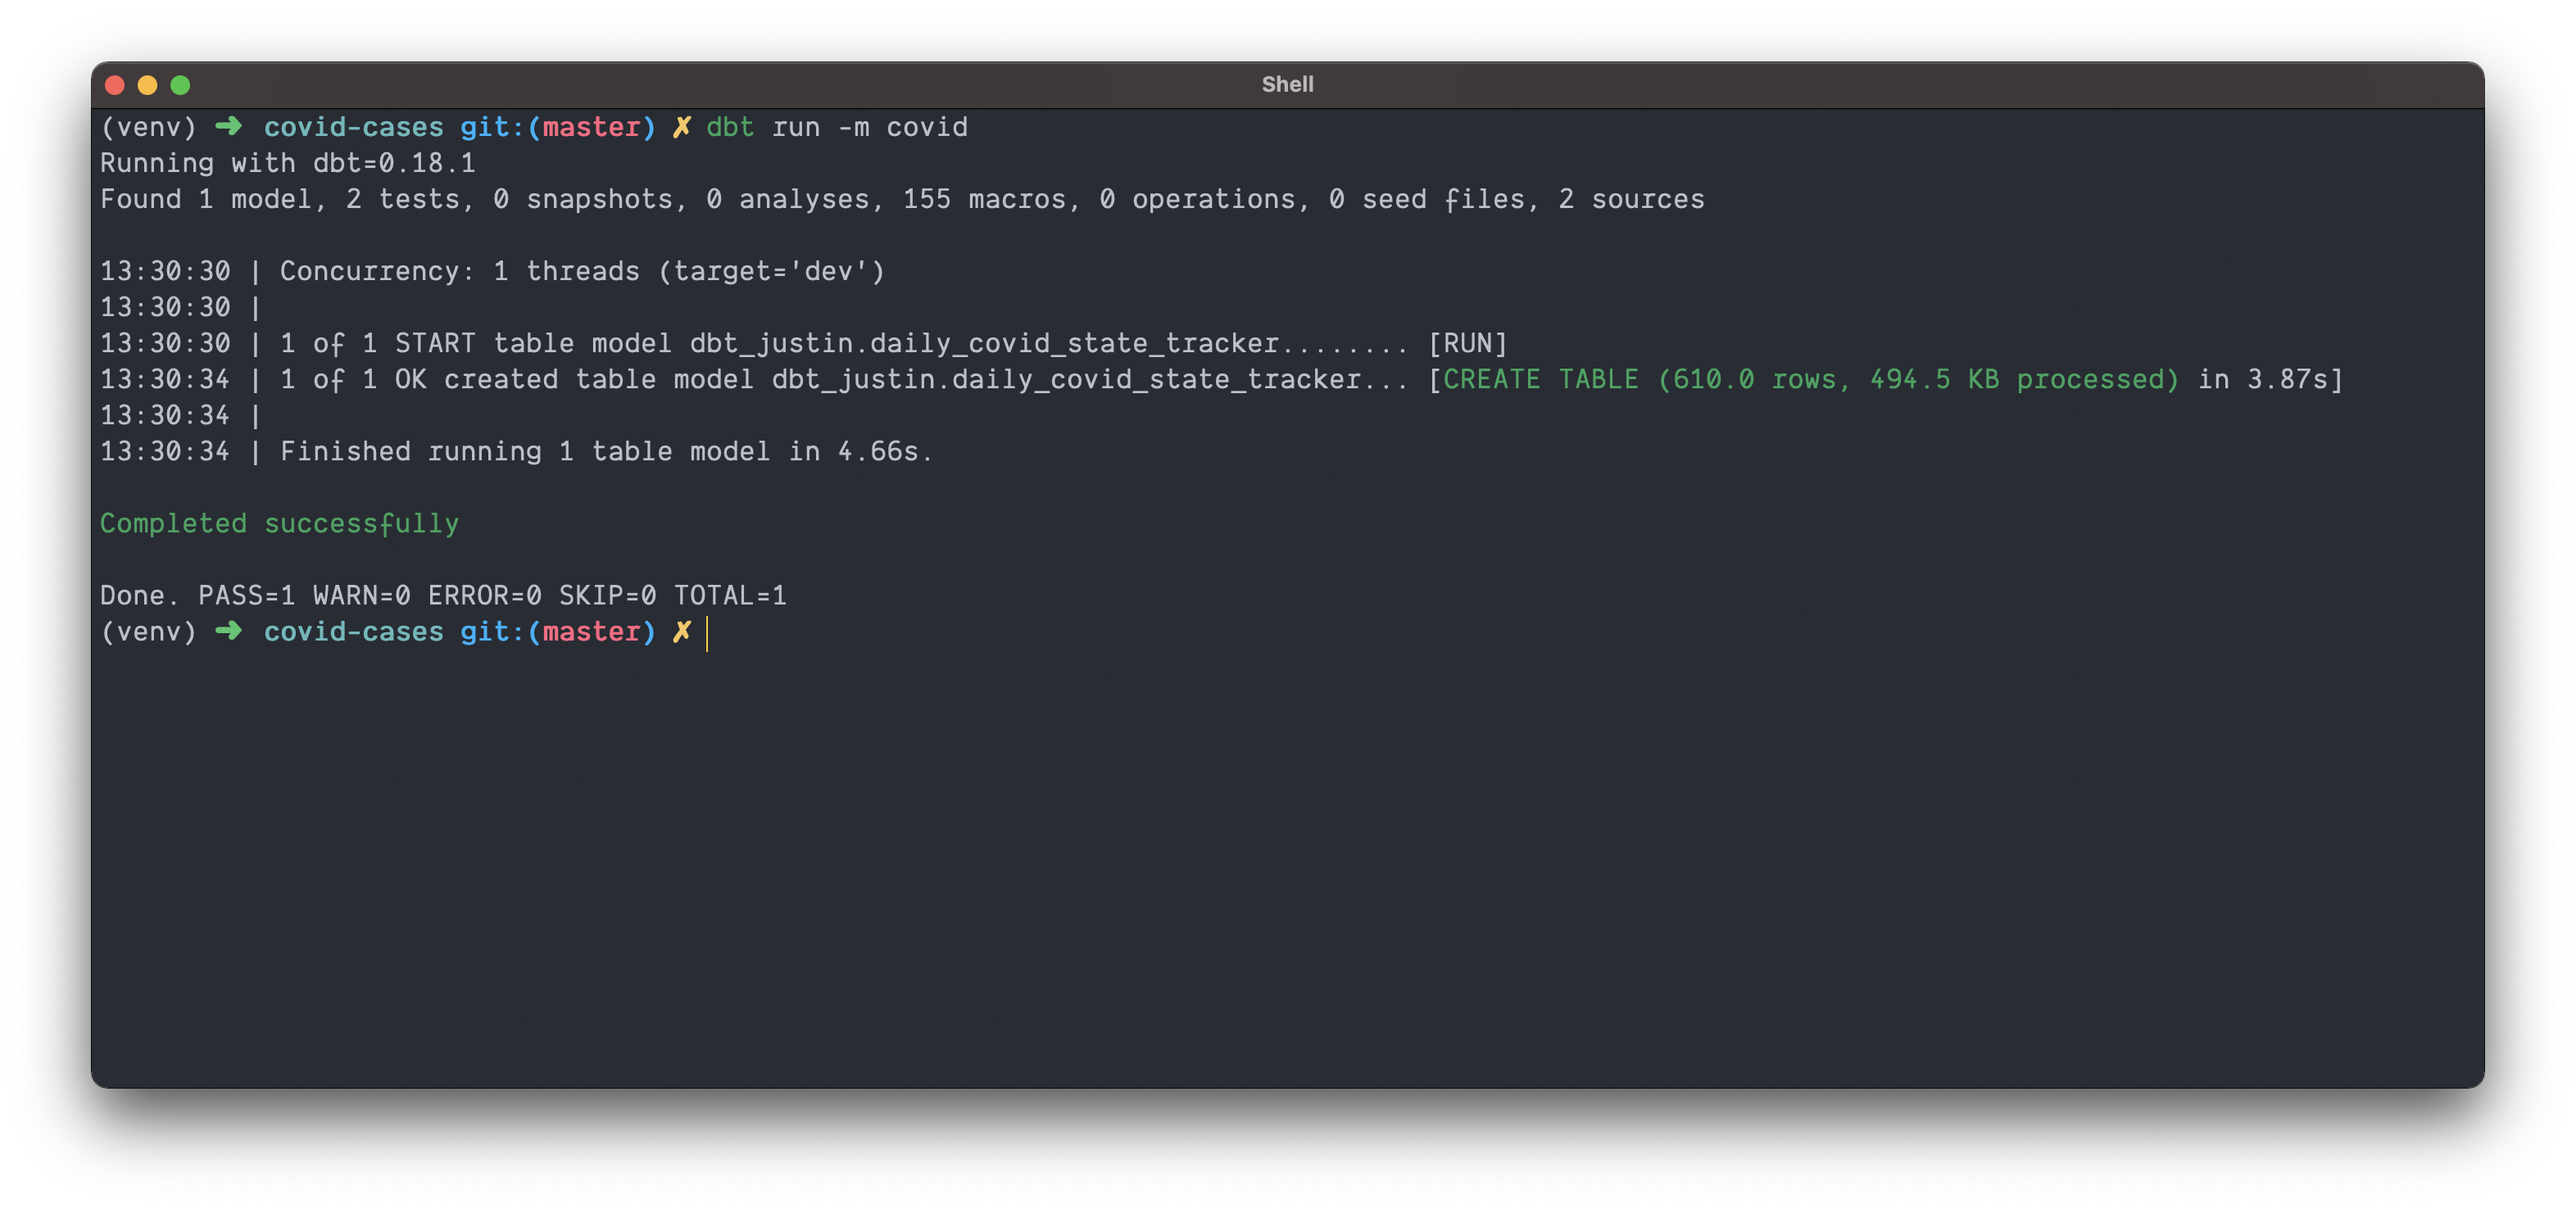
💡 If we had many transformations under models/covid/ the command we just ran would run them all.
Here’s the cool thing… Let’s say you added another covid model that selects from dbt_justin.daily_covid_state_tracker. If you use dbt’s ref() function (you should) to reference this dbt_justin.daily_covid_state_tracker, dbt will run both models but in the correct order. This means dbt will wait for dbt_justin.daily_covid_state_tracker to complete before starting the second model.
If you’re running many unrelated models, dbt can also run in parallel based on the number of threads: you specified in profiles.yml
If you want to run only one model, you could run dbt run -m models/covid/daily_covid_state_tracker.sql
An important note 💡
Starting off, you might find it strange to write sql outside of a sql client, and stranger to run it via the command line. If you’re just testing the beginnings of a transformation or prefer to query as you build you can still use a sql client and then paste the final transformation into your project once you’re satisfied.
It’s also worth noting that you can work backwards as well.
A nice feature of dbt is that you can always compile your project down to real sql for use in a client. Each time you execute dbt run your code will be compiled and put in the target/ directory.
Here’s what my target/ directory looks like after I first ran dbt run -m covid.
./target
├── compiled
│   └── covid_cases
│       └── models
│           └── covid
│               └── daily_covid_state_tracker.sql
└── run
    └── covid_cases
        └── models
            └── covid
                └── daily_covid_state_tracker.sql

8 directories, 2 files
target/compiledis home to all the compiled code that can be used for testing in your SQL client.- dbt will resolve all Jinja references to fully qualified SQL both so you can inspect it, and so you can use it.
- Each time you run
dbt runa new version of your model will be overwritten in this directory. - You can also run
dbt compileto generate your SQL without running your model. - This code will not contain DDL commands, only your
selectstatement.
target/runis home to all the code that was executed against your database- It will include all DDL commands like
create or replace table. - This is useful for debugging!
- It will include all DDL commands like
Testing the model
Testing our model is as simple as running our model. Even though our test is silly, lets run it anyways, by executing
dbt test -m covid
and 💥 we know our data conforms to our assumptions!
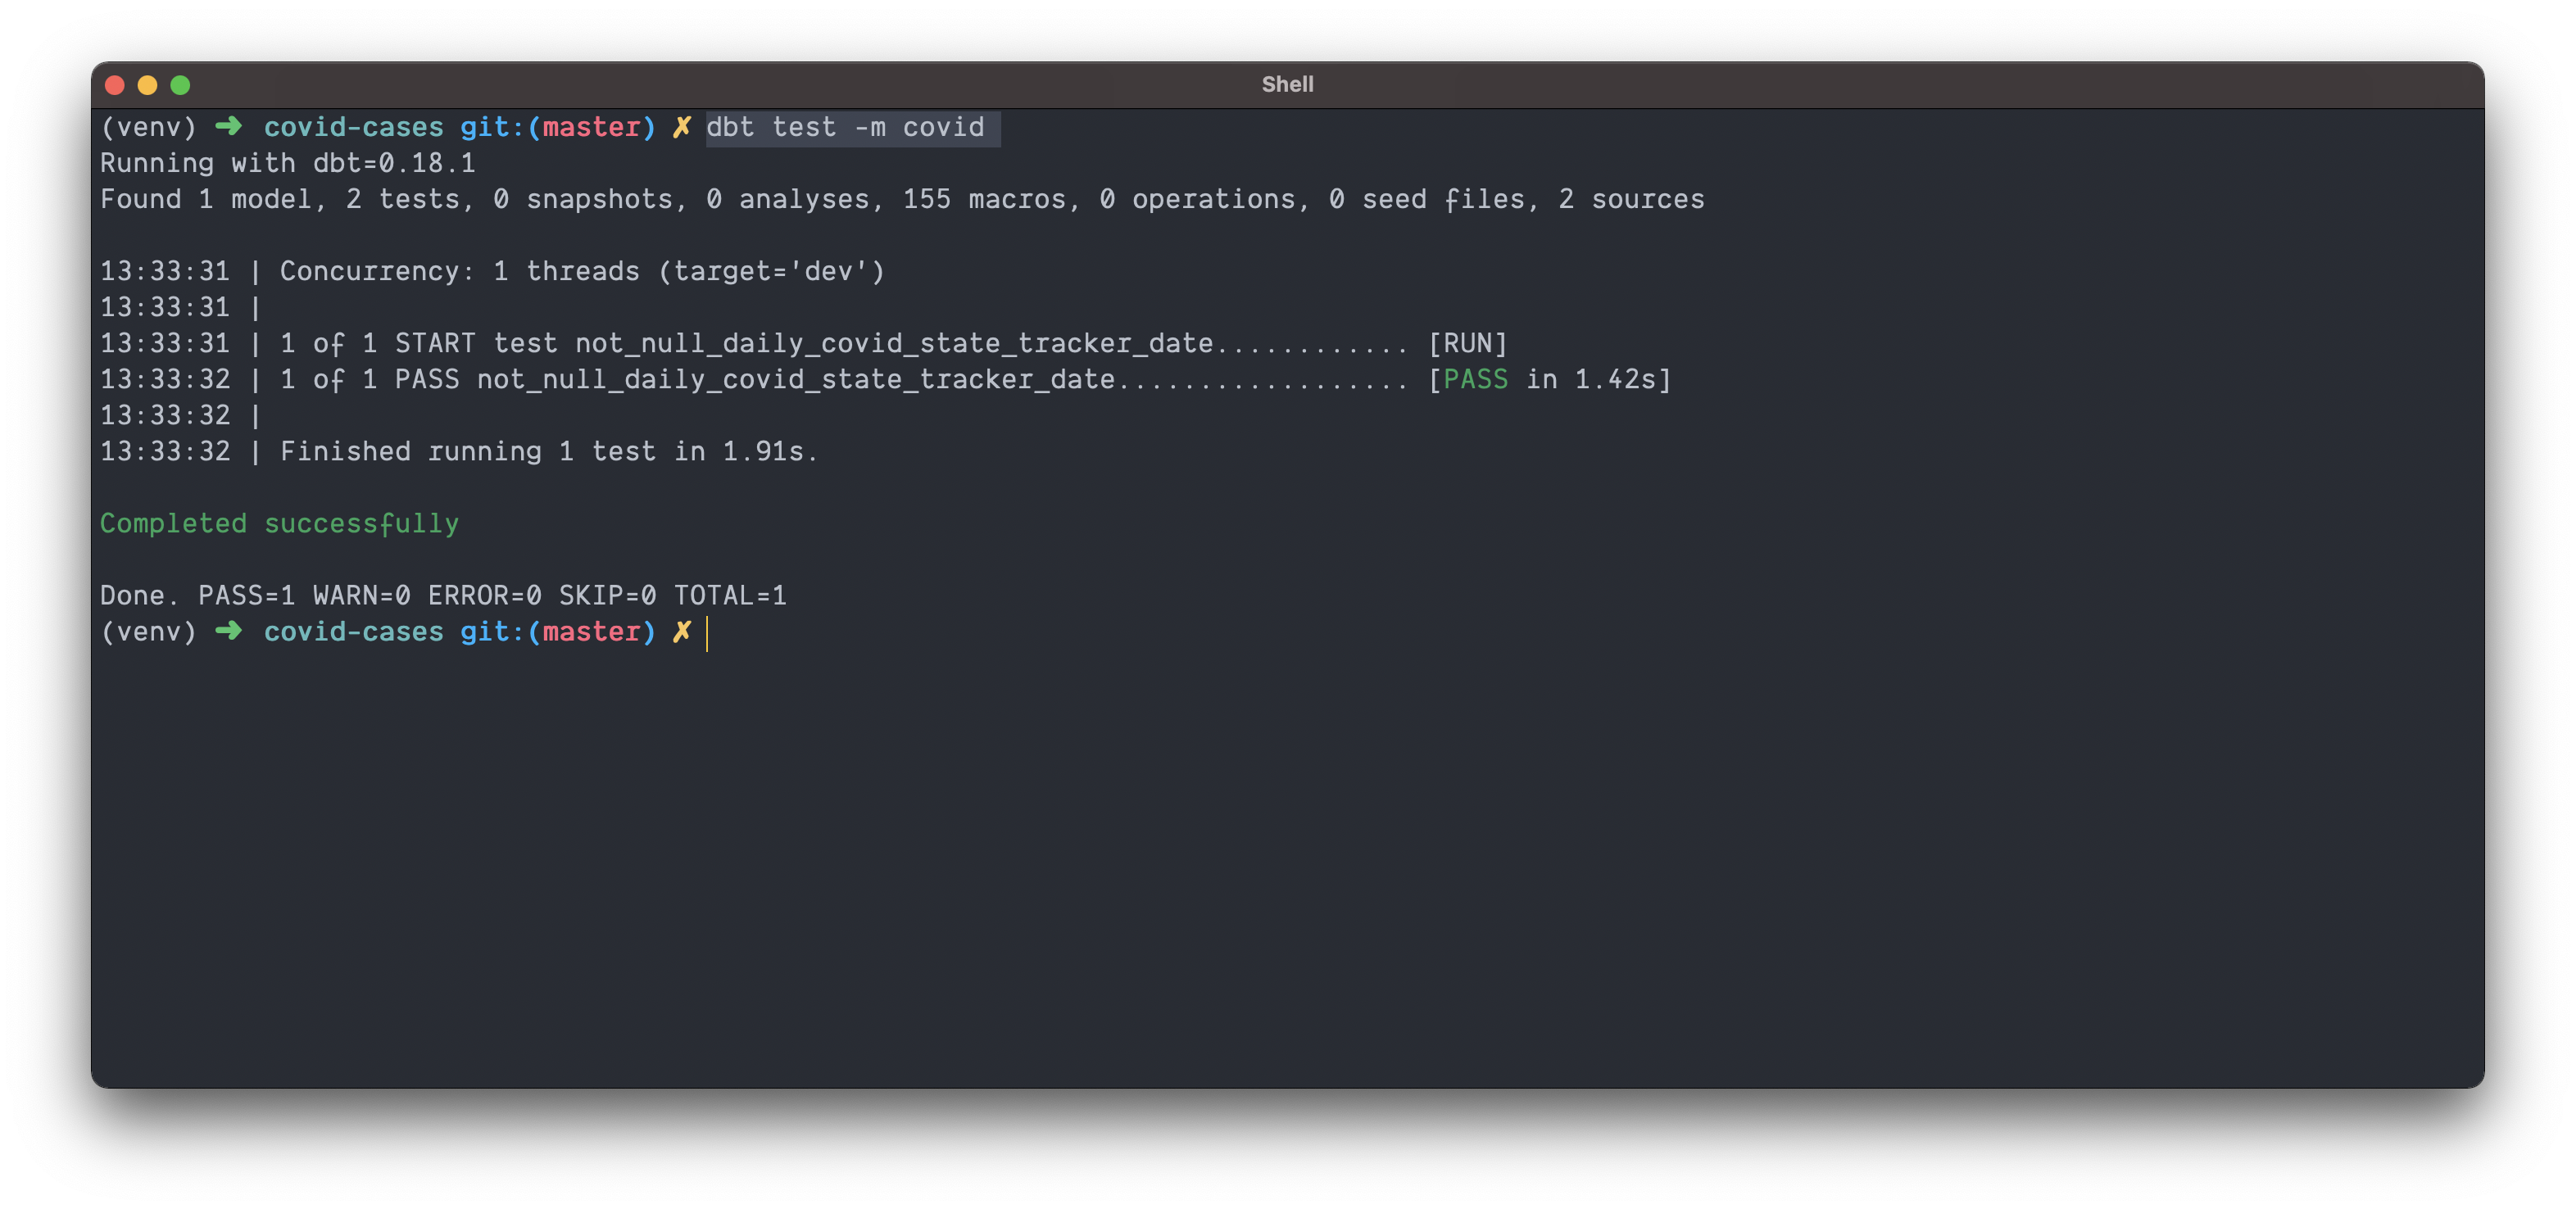
It’s also worth noting that if you look at your target/ directory, you should now see the raw SQL used to run the test.
💡 A good pull request template will ask a developer to explain what was changed, how they know a change worked, how they know a change isn’t breaking existing assumptions, and what new tests they’ve added. Being able to quickly run dbt run and dbt test, and add the output to a pull request is invaluably straight forward.
Without dbt test the developer had to be relied on to test manually. They might not run the same ones as another developer, and their tests might even be flawed! With dbt test there’s a consistent and shared understanding of how and what to test!
Although we’ve used a simple not_null test that ships with dbt, the possibilities of adding custom tests are limitless. One example is writing custom assertion tests.
Imagine a scenario where you have a large transformation with many joins and potential places to lose rows. You want to ensure that your output table isn’t missing anything compared to its upstream dependency. You can write a custom assertion test that asks “Is my row count in Table B (output) equal to my row count in Table A (input)"?
These are the kind of tests that allow you to develop SQL with a test driven development philosophy and will ultimately help you sleep better at night.
Inspecting our data
Now that we’ve materialized our model in the data warehouse, and tested its assumptions, let’s see what our data tells us about COVID-19 cases!
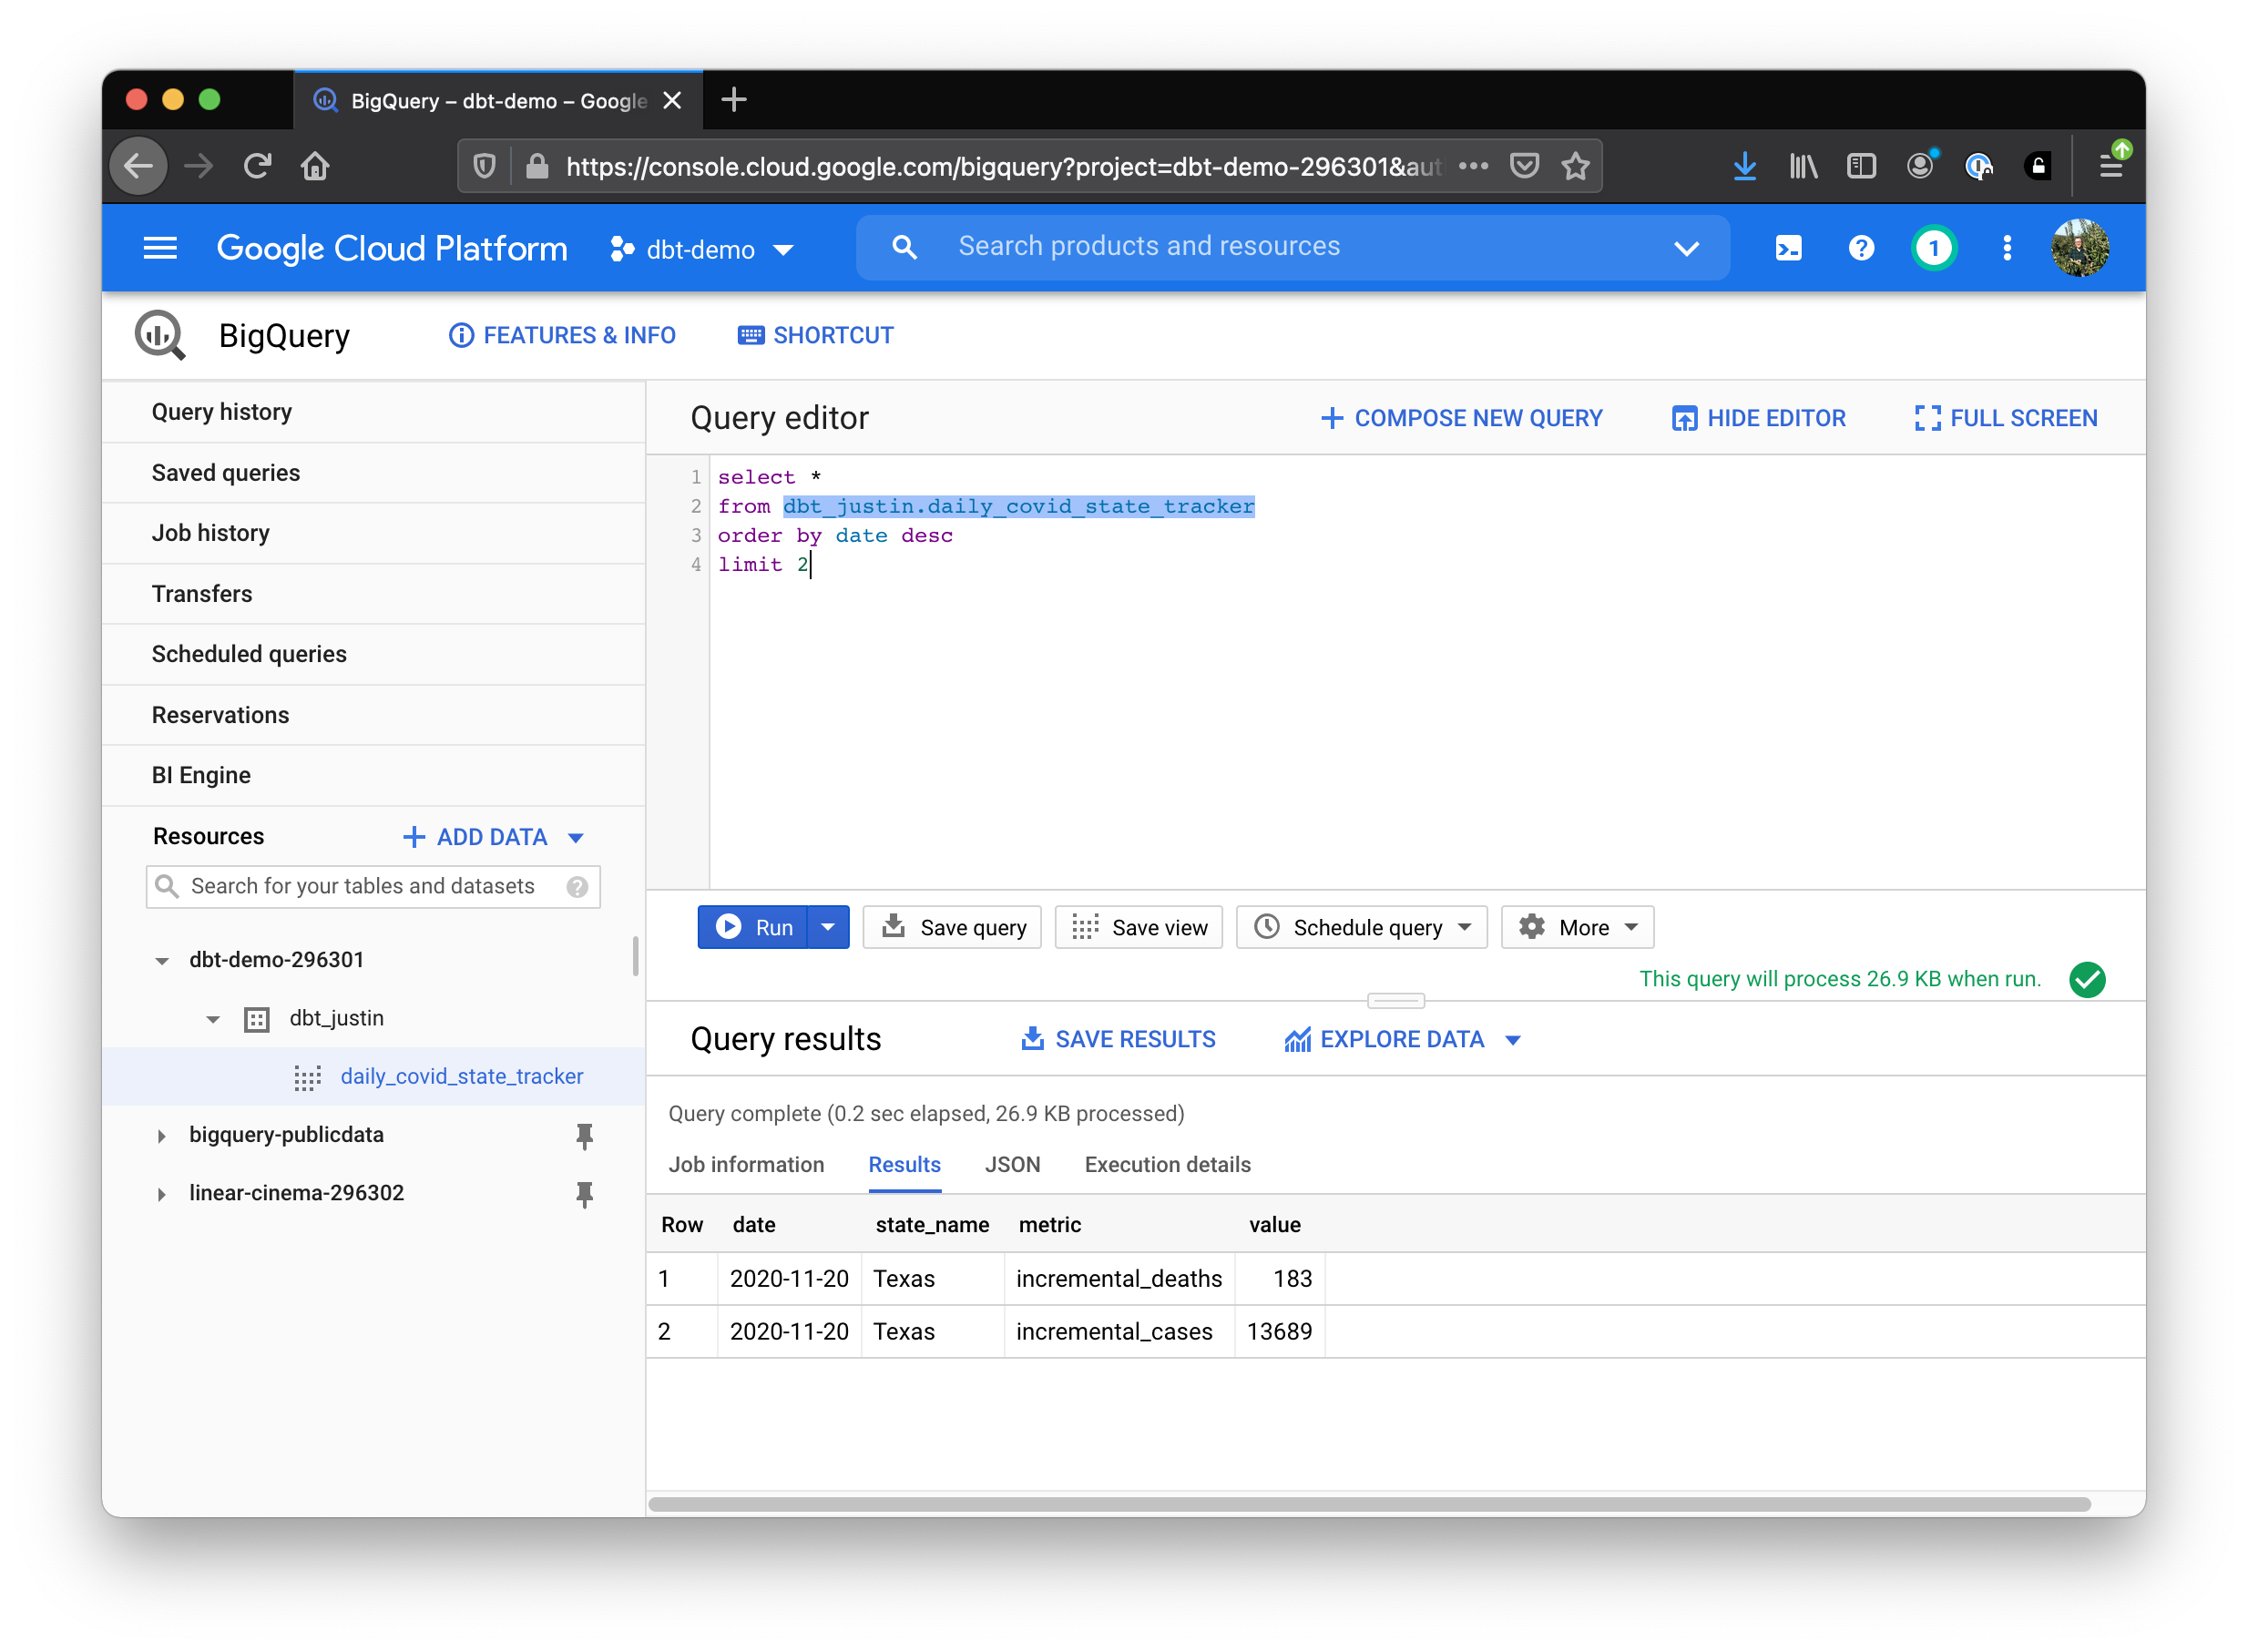
Let’s see what state(s) most recently won the title of most new cases and most new deaths. To find out you can run
select *
from dbt_justin.daily_covid_state_tracker -- change for your dataset
order by date desc
limit 2
And what do you know, congratulations Texas! Looks like it’s time to put on a mask 😷!
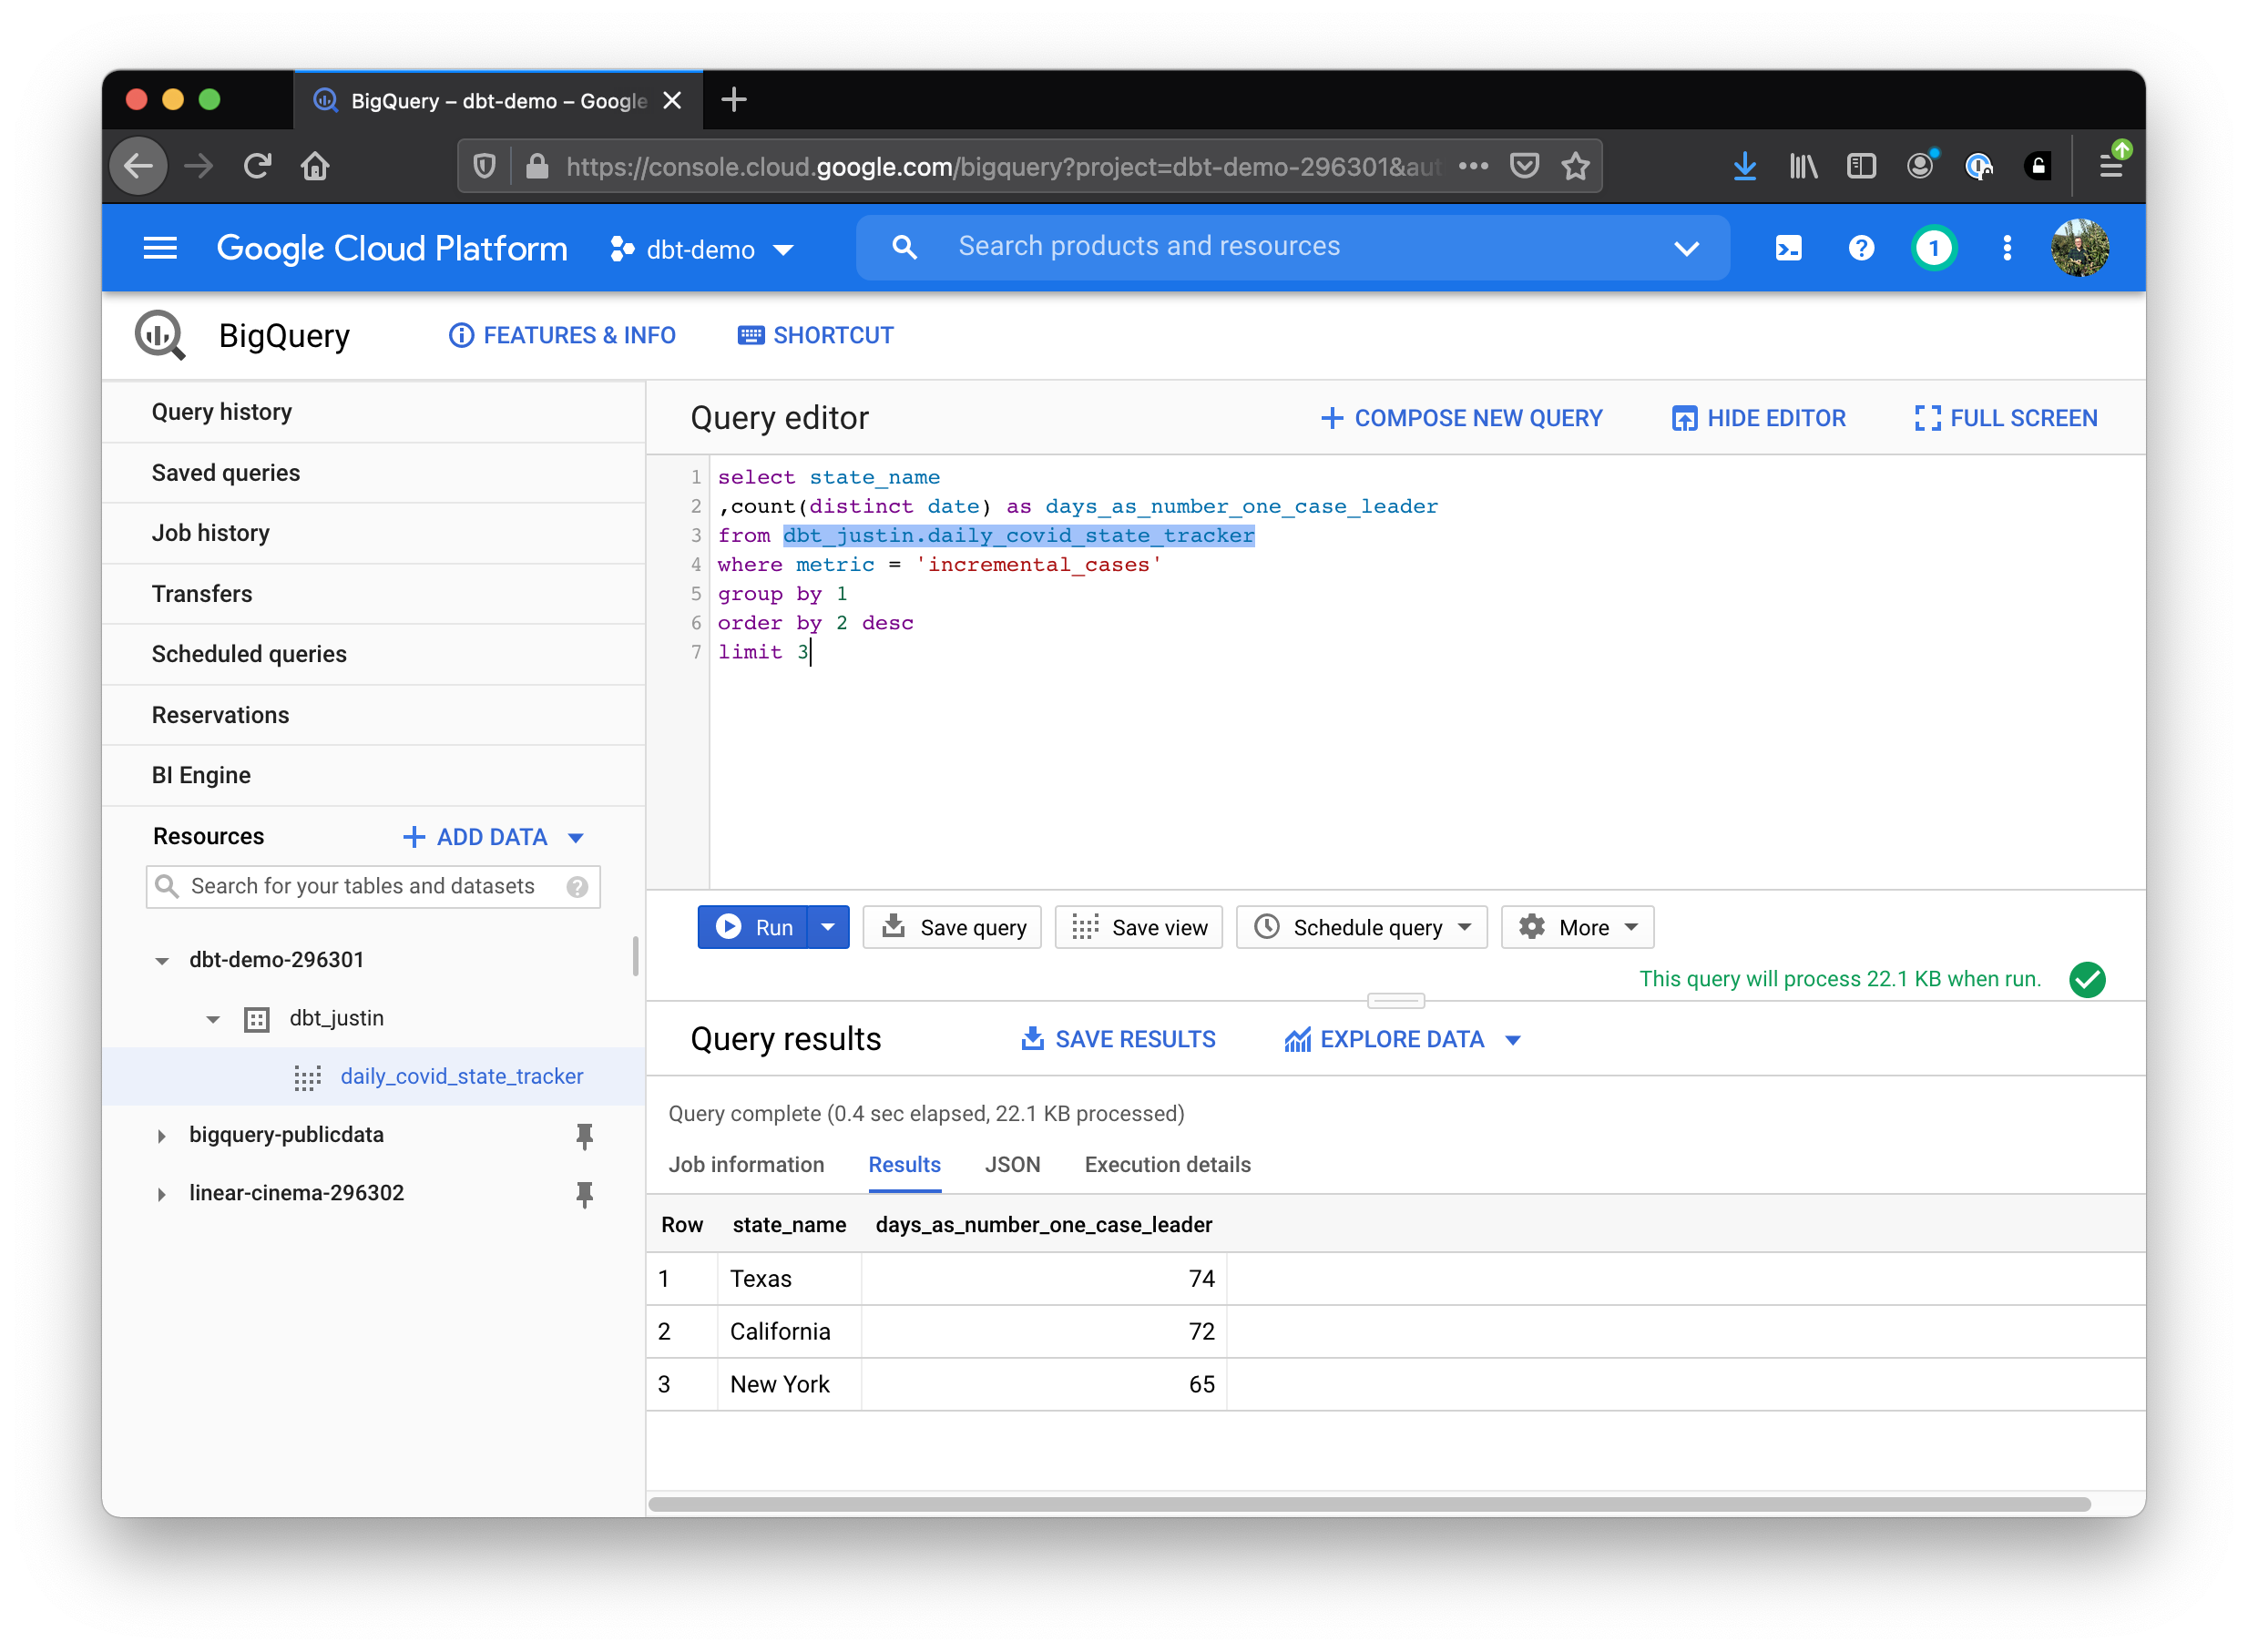
Okay, what about the question “What state has spent the most days as the #1 daily new case leader?”
select state_name
,count(distinct date) as days_as_number_one_case_leader
from dbt_justin.daily_covid_state_tracker
where metric = 'incremental_cases'
group by 1
order by 2 desc
limit 3
Texas again 🐎! followed by California 🌴 and New York 🗽.
Well, that was sobering… Let’s look at some documentation.
Viewing documentation
Being the good team members we are, we made sure to document and add tests to our code as we developed. To see our documentation site we have to run two commands
dbt docs generate && dbt docs serve
Once the site compiles your browser should open and be directed to the docs site!
With just one model, and one source, there’s not much to see in our docs, but the value is self evident. On the left you’ll see the site is broken down into two main views. You can view your project from the perspective of your folder structure, or from the layout of the database.
If you navigate to Database > YOUR_PROJECT > dbt_YOUR_NAME > daily_covid_state_tracker you’ll see the documentation we wrote for our model!
You’ll also find (along the top) access to your compiled SQL code, the ability to see what this model depends on, and what models reference this one!
The dependency graph (though this one is boring) is an awesome way to visualize how different models depend on one another.
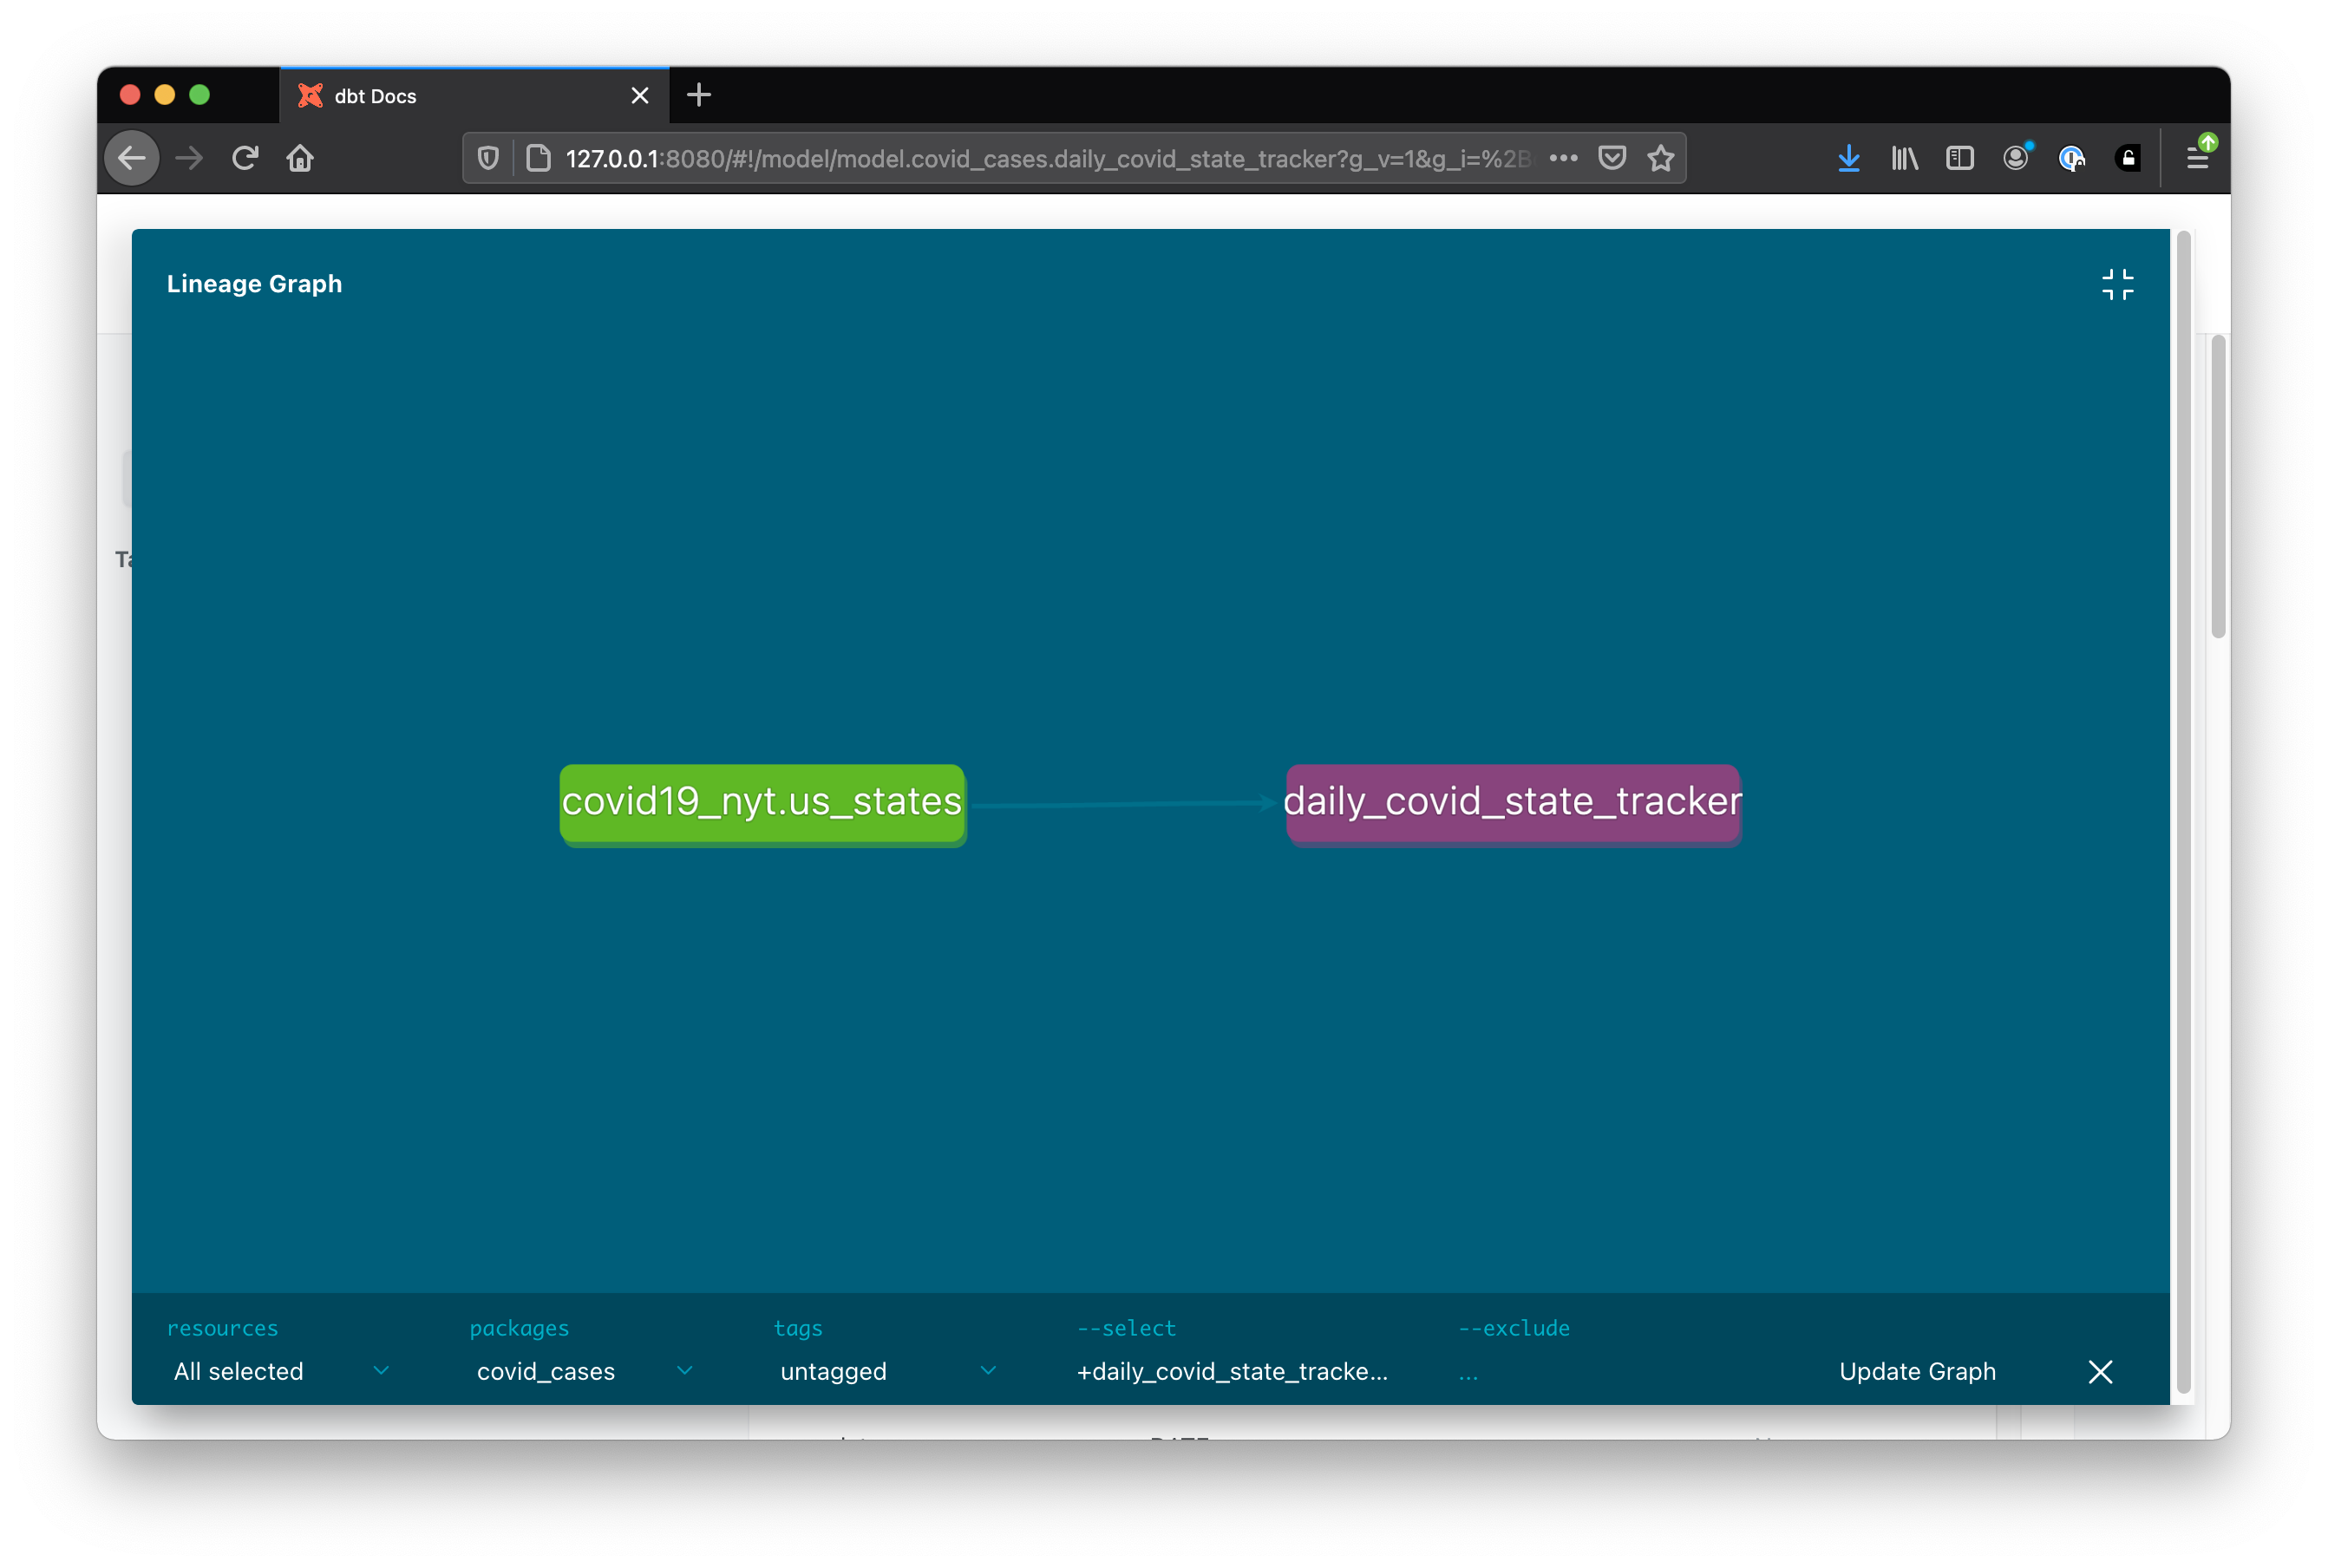
The magic of dbt, among other things, is the in use of ref() and source().
Similar to the way we used {{ source('covid19_nyt', 'us_states') }} in our model to reference our NYT source dataset, we could use {{ ref('daily_covid_state_tracker') }} to reference the model we just created.
In doing so, dbt will know that our new model depends on dbt_justin.daily_covid_state_tracker, will update the dependency graph to reflect that, and even run the models in the correct order if executed together.
Previously, I gave an example of needing to find all tables that rely on a specific source. If you navigate to Database > bigquery-public-data > covid19_nyt > us_states and choose Referenced By along the top of the page, you’ll see our model depends on this source!
Wrapping Up
Although this was a simplified example, it was simplified in the sense that our model and questions were simple.
The setup of dbt that I covered was about 90% of what you’d actually need to do to use dbt in a production environment. The remaining effort actually has more to do with moving code, adapting code and integrating with your orchestration tool than it does with dbt itself.
For me, dbt has been a game-changing advancement in my day to day life.
Transform
Before dbt the equivalent of dbt run was done through a series of complex and delicately orchestrated copy/paste maneuvers.
Modularizing code meant maintaining DAGs manually which sometimes leads to bloated transformations. Through the use of ref() those barriers go down a little and transformations can be organized logically. With source() I can link my transformations to upstream source data, and validate that it’s sufficiently qualified for use. Even if an upstream pipeline fails silently or there’s an unnoticed delay our transformation can tell us something isn’t right.
I can even avoid incurring unnecessary spend if my data isn’t fresh - there’s no sense in running a transformation that will overwrite data with the exact same data!
Test
Before dbt, testing was mostly limited to checking row counts before and after a change takes place. That, plus looking up known values in a table to make sure they hadn’t changed. Plus, of course, the sniff test 👃🏽.
Those three things can be disastrous for any team member let alone a new employee trying to feel their way through years of existing code (or me after a drink).
With dbt test, a consistent and agreed upon set of tests can be run easily every time. You can get pretty creative with custom tests too. I also like that you can write tests and build models around them (TDD) instead of just hitting the ground running and thinking of tests later.
Documentation
Before dbt, documentation was a confusing cocktail of Github wiki’s, Confluence docs 🤢, strewn about README’s and verbally passed down mythologies.
With dbt docs I can document my data alongside my code, and have a powerful UI to explore relationships, owners, definitions and dependencies. I dare say I can actually figure out how the sausage is being made, when I’m making it.
I hope this post served as an “a-hah” moment and can help you get exploring and using dbt! If I screwed up, let me know @itswagg.